Up_to_date_with_ me

Why we live in an anti-tech age

Complex planning -- and true innovation -- is out of fashion, argues PayPal co-founder Peter Thiel

Does Science Back Samsung's 80% Battery Boost Claim?

A longer-lasting smartphone battery has been on the to-do list of tech companies for years. And now Samsung claims to have developed one that could keep your phone humming for 80 percent longer. But could the new battery really boost battery life by that much? Some scientists are skeptical, saying the study researchers didn't account for energy that's permanently lost after the battery goes through its first charge-recharge cycle.

US Military's Hypersonic Jet Could Fly 5 Times the Speed of Sound

The U.S. military is reportedly developing a hypersonic jet plane that could soar at up to five times the speed of sound — faster than a bullet, which generally travels at Mach 2, or twice the speed of sound.

World's Thinnest Light Bulb Created from Graphene

raphene, a form of carbon famous for being stronger than steel and more conductive than copper, can add another wonder to the list: making light. Researchers have developed a light-emitting graphene transistor that works in the same way as the filament in a light bulb.

Remote Control Airplanes Review

Remote control airplanes bring the thrill of flight to your backyard or local field

Saturday 11 July 2015

What is Tivoli Storage Manager TSM Fastback for Workstation clients - Video Tutorial

What is Tivoli Storage Manager TSM Fastback for Workstation clients - Video Tutorial


Tivoli Storage Manager FastBack for Workstations client

The Tivoli Storage Manager FastBack for Workstations client provides a flexible, easy to use file protection system. Your most important files can be continuously protected. Your less important files can be protected at scheduled intervals to save time and storage space. Email files can also be protected. And you can prevent any changes (including deletions) to files in folders that you designate as vaults.
Continuously protected files are backed up to a local drive. This means that backup copies are created even when network conditions prevent storing backup copies remotely. Continuously protected files can also be stored on remote storage locations, when network connections allow. If a remote location is not available when you change a continuously protected file, the Tivoli Storage Manager FastBack for Workstations client makes a backup copy on that device as soon as the device becomes available. Scheduled backup copies are created on the interval that you configure (hourly, weekly, daily, or monthly). If the remote device for scheduled backups is not available at the time of the backup, theTivoli Storage Manager FastBack for Workstations client makes backup copies on the remote location as soon as that device becomes available.
Every time you change a file, a backup copy is created. You can choose which version of a protected file you want to restore, and configure how many backup copies to save.
This diagram provides an overview of how the Tivoli Storage Manager FastBack for Workstations client protects your data.
Product overview diagram. Continuously protected files can be backed up to local storage or remote storage. E-mail and other files that are protected on a schedule can be backed up only to remote storage. You can restore files from either local storage or remote storage.
After installation of a Tivoli Storage Manager FastBack for Workstations client, the client immediately provides continuous protection for a pre-configured list of files. You can see the backup copies in the \RealTimeBackup\ folder in the root of your primary drive. The backup copies can also be seen in the list of files that you can restore with the Restore Wizard of the client. The default space allocated for your backup copies is 500 MB.
You can configure other lists of files to protect, other storage areas, scheduled protection, and other protection options, using the client or the central administration console.
Tivoli Storage Manager FastBack for Workstations can store backup copies on a Tivoli Storage Manager server, but there is no requirement to use Tivoli Storage ManagerTivoli Storage Manager FastBack for Workstations is a stand-alone product and has no dependencies on Tivoli Storage Manager or Tivoli Storage Manager FastBack.


Basics of Tivoli Storage Manager FastBack for Workstations central administration console (CAC)

With the Tivoli® Storage Manager FastBack for Workstations central administration console, you can centrally manage many Tivoli Storage Manager FastBack for Workstations clients.
With the central administration console, you can manage Tivoli Storage Manager FastBack for Workstations clients in the following ways:
  • Discover existing Tivoli Continuous Data Protection for Files and Tivoli Storage Manager FastBack for Workstations clients.
  • Monitor the activity of clients to determine the health of your data protection system.
  • Tune performance of clients and react to potential problems to maintain the highest level of data protection. You can update configurations and send command scripts.
  • Deploy software updates throughout the enterprise.
The central administration console is a tool for monitoring and managing the clients. The central administration console makes an administrator's job easier, but is not a requirement for protecting your data. Tivoli Storage Manager FastBack for Workstations clients can protect your data without the central administration console. If you do not install the central administration console or if the central administration console is not running, your data is still protected by the Tivoli Storage Manager FastBack for Workstations clients.
Tivoli Storage Manager FastBack for Workstations can store backup copies on a Tivoli Storage Manager server, but there is no requirement to use Tivoli Storage ManagerTivoli Storage Manager FastBack for Workstations is a stand-alone product and has no dependencies on Tivoli Storage Manager or Tivoli Storage Manager FastBack.
The following concepts are key to understanding the central administration consolegroups and administration folders:
Groups
With the central administration console, you can administer many clients at a time. You can filter and select clients based on several criteria, but a typical filter is achieved by assigning clients with similar data-protection needs to the same group.
Administration folders
The central administration console communicates with clients by sharing information with clients in administration folders.

[facebook src="Uptodatewithme" width="500" height="400" hide-cover="true" posts="true"/]

How to Integrate TSM Fastback Server with TSM Server to protect FastBack Client Data

How to Integrate TSM Fastback Server with TSM Server to protect FastBack Client Data


TSM Fastback Integration with TSM Server Steps

Before you can use the Tivoli Storage Manager Client Configuration wizard for FastBack, you must perform some tasks.
  • Ensure that either the Tivoli Storage Manager FastBack server, or the FastBack Disaster Recovery Hub, is installed and configured for short-term data retention. Also make sure that at least one snapshot has been taken.
  • Ensure that the Tivoli Storage Manager backup-archive client is properly configured with a Tivoli Storage Manager server. Also make sure that the Tivoli Storage Manager client acceptor service (dsmcad.exe) is running. You can use the Tivoli Storage Manager Client Configuration wizard in the Tivoli Storage Manager Java™ GUI, after you install the backup-archive client.
  • You must perform a one-time post-installation setup for these purposes:
    • To specify a FastBack user name and password to be used by the wizard, to query and mount volumes from the Tivoli Storage Manager FastBack repository
    • To run Tivoli Storage Manager Scheduler scripts

  • Set up the Tivoli Storage Manager FastBack credentials file:
  1. The user ID that you specify must have Tivoli Storage Manager FastBack administrative authority. To configure the user ID and password, run this command on the workstation where the Tivoli Storage Manager backup-archive client and FastBack server or Hub are installed:
     
    cd <TSM_FastBack_install_location>\FastBack\shell

    The <TSM_FastBack_install_location> is the base directory location where Tivoli Storage Manager FastBack client is installed.

  2. Now create a folder called FastbackTSMScripts under the system drive of the workstation, if it does not exist, using the following command:
     
    mkdir <machine_system_drive>:\FastbackTSMScripts
     
  3. Now run the fastbackshell command:
     
    FastBackShell -c encrypt -u userName -d domain -p password -f
    <machine_system_drive>:\FastbackTSMScripts\credential.txt

    The following options are used in this command:
    • -u specifies the Tivoli Storage Manager FastBack admin user name.
    • -p specifies the Tivoli Storage Manager FastBack admin password.
    • -d specifies the Tivoli Storage Manager FastBack domain for the user name.
    • -f specifies the output file where the encrypted credentials are to be written.

The credentials file must be generated with the name "credential.txt". The credentials file must also be located in the "FastbackTSMScripts" directory of the system drive of the workstation, for the wizard to function properly.
    You can use the client configuration in the backup-archive client Java GUI or the backup-archive Web client which are show in below screenshots

    Below Screenshots explains more how to Integrate TSM FastBack and TSM Server

    • Initially register the TSM Backup/Archive Client which takes backup of FBclient data in FastBack Server to TSM Server as a client node as shown below. Node Name I used is tsm. Register a Tivoli Storage Manager node for each FastBack client where Tivoli Storage Manager backs up or archives data. The node name must be the short host name of the FastBack client.

    • Now Install TSM B/A client on the Fastback Server.
    • After Installation, open TSM Client Configuration Wizard to define dsm.opt file and set required parameters.
    • Go through all the steps that required B/A client to communicate with TSM Server and click Finish.
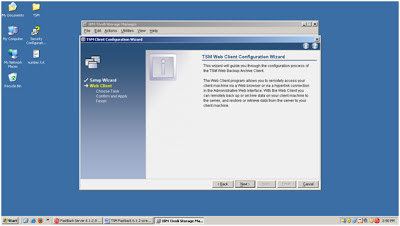
    • Now open TSM Setup Wizard to define client and webclient scheduler using DSMCAD as shown below.
    • Similarly Configure TSM Webclient Service by using the following wizard.
    • Now create a folder called FastbackTSMScripts under the system drive of the workstation, if it does not exist, as shown below.
    • Now we need to generate credential.txt file by using the belwo command.

    FastBackShell -c encrypt -u userName -d domain -p password -f
    <machine_system_drive>:\FastbackTSMScripts\credential.txt

    This command will store the credentials of the fastbackserver, and allows B/A client to access its repositories for the Backup to TSM Server.

    • Now open the TSM Client Configuration wizard and select Help me configure the client to protect the Fastback Client data.

    • Make Sure you did all the said requiremetns. If you do not configure the credential.txt file properly, you cannot able to go to next step here in this wizard.
    • Select TSM FastBack policy and client & volumes to be protected by TSM Server and click Next.
    • Check the protection options, protection type and client name as below and click Next.
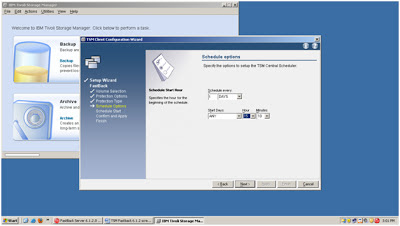
    • Specify the schedule options and times as required.
    • Specify the TSM Server Administrator User Id and password to define the TSM Schedule.
    • Now, register fastback client as client node in TSM Server as shown below.
    • Finally its time to double all your configurations to confirm and apply. Then click Finish.
    • You can also check in TSM server if the schedule for protecting FastBack client data has been correctly done or not by using Q event * * command.


    [facebook src="Uptodatewithme" width="500" height="400" hide-cover="true" posts="true"/]

    How to move or restore TSM Fastback Server repository with the same exisitng server configuration

    How to move or restore TSM Fastback Server repository with the same exisitng server configuration


    Moving or Claiming a TSM Fastback Server Repository:

    If you are upgrading your Fastback server, or just moving to another machine, you can use this as a general guide on steps for the move, and what files to move to the other machine. This is for Fastback servers that are currently running and whose data can be accessed. This method will help you keep your data/repository, your policies, and your schedules. This is the IBM recommended method and I advice you to first test this on a test fastback server and implement on the production server to minimize errors.

    Step 1: Make a copy of essential FastBack Configuration files.

    The First step is to backup a copy of FastBack Servers essential configuration files. Before you copy the files make sure to stop the FastBack Server Service from the services control panel. You should do this step on a daily basis to secure your Fastback server from sudden disasters. The FastBack Configuration files are located by default in the 

    "C:\Documents and Settings\All Users\Application Data\Tivoli\TSM\Fastback\Server" directory. 

    You can copy the whole folder, or to save space you can just copy the following configuration files, to a temporary location on your network. 

    1. History.txt and History.txt.sig: This is keeps track of all the snapshots in your repository
    2. Orabr_Conf.txt and Orabr_Conf.txt.sig: This keeps track of your general Configurations
    3. Conf.txt and Conf.txt.sig: This keeps track of policy and scheduling configurations
    4. Clog10.sf: General Log and error messages
    5. Users_enc..txt and Users_enc.txt.sig: Keeps log in and user account information
    6. Inprogress.txt and Inprogress.txt.sig: Keeps the current Job ID counter
    7. State.txt and State.txt.sig: Keeps the current state of the different process that are running

    Step 2: Remove the old Fastback Server from the network.

    This step is very important because even if you uninstall Fastback server, fastback clients will still point to the old Fastback server. Power down your old server and remove it from the network. Attach your new server to the network and power it up. Move any physical drives that need to be attached to the target (the new Fastback Server) at this time.

    If you attach a drive or drive array to the target server after the Fastback Server software has been installed you will need to use the DISK OPEN utility to allow read and write privileges for it (by default any disk added to the Fastback server after Fastback software has been installed, is read only).

    Step 3: New Fastback Server Installation

    Make sure your new computer meets the requirements for TSM Fastback Installation. Install the Fastback software on the target computer. Go through the Installation Wizard and choose the TSM Fastback Server option.

    If you change the network name on the target server, you will have to manually open up the Client Configuration on the client machines and change the target to the new Fastback server (This will also be true if you are using IP address instead of network names).

    Step 4: Copying Over the Policies and Configuration Files

    This is the important step where you should copy the important files which have all the configuration details of your old Fastback Server. Stop the FastBack server Service and then copy over the data from step one. Only copy over the following files. Please don't play with these important files at any circumstances, if they are corrupted then they will be useless.

    1. History.txt
    2. History.txt.sig
    3. Orabr_Conf.txt
    4. Orabr_Conf.txt.sig
    5. Clog.sf
    6. Users_enc.txt
    7. Users_enc.txt.sig
    8. Inprogress.txt
    9. Inprogress.txt.sig
    10. State.txt
    11. State.txt.sig

    Place copies of them in the following locations:

    1. C:\Documents and Settings\All Users\Application Data\Tivoli\TSM\Fastback\Server
    2. C:\Documents and Settings\All Users\Application Data\Tivoli\TSM\Fastback\Server\Mirror

    Step 5: Moving or Claiming your Repository

    Start the FastBack Server Service after completing step 4. It will take a couple of minutes to go through it initialization phase. After the initialization phase, approximately 5 minutes, you can start the FastBack Manager GUI. Upon start up the FastBack Server is not going to automatically know where the repository space is. You will need to go to the 

    "General Configuration -> Storage Pool -> Repository Pool", right click on repository pool and select "Claim Repository". You will need to claim each repository space you had for you old server. Make sure the repository volumes keep the same drive letter as they had on the original server.

    If you start the Fastback Manager and it is in Limited Mode, you will not be able to "Claim Repository" until you fix the limited mode issue.

    Step 6: Checking your new Fastback Server Configuration setup

    You can verify that the procedure worked by making sure all your settings exist in the configuration menu and that your policies exist as well. You can also select any particular policy and Right Click it, and select "Run Snapshot", this will verify that your new server can communicate with the clients. Check to make sure that the snapshot ran in the Snapshot Monitor.

    [facebook src="Uptodatewithme" width="500" height="400" hide-cover="true" posts="true"/]

    How to troubleshoot TSM Fastback server connection issues and errors

    How to troubleshoot TSM Fastback server connection issues and errors


    FastBack Client may not connect to the server when specifying IP address in Client Configurator

    FastBack Client doesn't connect to FastBack Server even though the correct IP address of the server is specified in FastBack Client Configurator. This problem happens in case that hostname of the server cannot be resolved by specified IP address. FBSA6037E message box brings up from FastBack Client Configurator in case hostname cannot be resolved by the specified IP address.

    The following errors can be found in FastBack Client technician logs after FastBack Service restarts.:

    E18.ORA_Agent : OAI_S_Init: Failed to resolve host name nnn.nnn.nnn.nnn
    E18.ORA_Agent : OAI_S_Init: Will wait 1 hour before exit and restart

    Solution:

    Add hostname and IP address into hosts file of the client machine, or specifies DNS server in the property panel of Internet Protocol (TCP/IP) to resolve hostname by IP address.

    FBSG5804E Please verify IP/Computer name because of connection failure at 127.0.0.1

    The FastBack Manager cannot connect to the FastBack server. The following error comes up in a dialogue box upon FastBack Manager start and looks like this:


     Solution:

    The default location for the FastBack server technician logs is here:

    Windows 2003: %documents and settings%\all users\application data\tivoli\tsm\fastback\ 

    Windows 2008: %programdata%\tivoli\tsm\fastback\

    Review the latest technican log (FAST_BACK_SERVER040.sf) and search on the failure message

    Specifying the Fastback server hostname or IP address would solve the problem in most cases.  If not clicking connect option multiple times until the dialogue box disappears will work as well. However, this error message will not stop any of your fastback server processes. 

    What is FastBack Checkpoint Snapshots ?

    In the FastBack Manager there is an option to run a Checkpoint snapshot against the policy which most of us never use it. A Checkpoint Snapshot can be performed by right clicking on a policy and selecting Run Check Point. 

    A Checkpoint will compare the data on the client against the data on the server and backup all changes that have occurred since the last known successful Full, Incremental Delta Block, or Checkpoint snapshot. When performing a Checkpoint backup, blocks that were captured with a regular Incremental Snapshot will be recaptured. Although this will again backup the blocks, it will not fix any corruption that may have occurred within the snapshot data.

    FBSS7068E the volumes length exceeds the maximum support volume length

    Some of the related return codes of this error are FBSS7068E, FBSS7068E, and FBSS7027E. All Snapshot backups will get aborted with these return codes when attempting a snapshot. The possible main reason would be if snapshot size exceeds 2TB.

    To know why the backup has been aborted right click on the aborted snapshot and select Events. Window may show the following errors:

    FBSS7068E The volume's length exceeds the maximum support volume length
    FBSS7027E System error. Fault [8179:0x00000100]. Process ended.
    FBSS7037E Procedure aborted

    Solution:

    There is no exact solution for this error if you have configured your Fastback server without meeting all the Fastback Server requirements. There is a FastBack limitation whereby the snapshot size cannot exceed 2TB or the snapshot will abort. This size limitation is noted in the FastBack manual. Thats why it is always important to read the manual before you use it.

    Tivoli Storage Manager FastBack does not support backing up of volumes larger than 2 TB. Ensure to check that the volume you are backing up is less than 2 TB.

    If you are stuck in this kind of situation, the only solution is Uninstall Fastback Server and change your disk size (must be less than 2TB). Reinstall Fastback server with all the requirements met and try the snapshot backup again. 


    [facebook src="Uptodatewithme" width="500" height="400" hide-cover="true" posts="true"/]

    How to restore client data from TSM Fastback server repository

    How to restore client data from TSM Fastback server repository


    • Recover volumes. For more information about recovering volumes
    • instant restore with FastBack Mount. For more information about instant restore
    • Recover files. For more information about recovering files
    During the cleanup process, FastBack Server detects snapshots that are potentially corrupted. When FastBack Server detects a potentially corrupted file, a warning message is displayed and a message is written to the FastBack Server log. During the next scheduled snapshot of the volume a job is run to repair the snapshot. You must not use a potentially corrupted snapshot. If a problem occurs and you need the data before the repair job for the snapshot completes, complete the following steps:
    1. Run the file system check tool. You can see the operating system documentation for more help in completing this step.
    2. Run the application consistency check tool. You can see the operating system documentation for more help in completing this step.

    TSM Fastback Restore Procedure

    Below Screenshots shoes how to restore FastBack data using Volumes and FastBack Mount.
    • Select the Recovery Tab, which shows various ways to restore the client data
    • To restore the data using volume restore, go the Snapshot Monitor tab and select the completed backup and right click on it. Then select Snapshot Volume Restore option.

    • Now choose the destination to restore the backedup data and click Apply

    • Alternatively if you choose Disk Restore instead of Snapshot volume restore in the previous screenshot, it will ask source and destination for restore. Select the snapshot and the destination disk for recovery as shown below.
    • You can also use FastBack Mount wizard for recovering the data, select the repository and destination to start the recovery process.


    [facebook src="Uptodatewithme" width="500" height="400" hide-cover="true" posts="true"/]

    How to take backup through TSM Fastback Client on Windows

    How to take backup through TSM Fastback Client on Windows


    • A repository should be added in FastBack Server where the server stores client data.
    • Install FastBack Client on client machine and make sure it is running. Use correct hostname or IP address of FastBack Server while starting Client Configurator.
    • Suitable network resources.

    TSM Fastback Client Backup Procedure

    • Start FastBack Client Configurator on client machine using corrent fastBack Server IP address and hostname.


    • Open FastBack Manager on the Server, you should see the client hostname in the list under Storage Pool tab. In the belwo screenhsot WIN-7IMV9HRDTBA is our FastBack Client which shows available drives which can be backed up.
    • Select the drive which you to take the backup.

    • Now create policy, which include Job Schedule and Client groups. You can define Job Schedule & Client Groups seperately or you can directly define Policy which automatically defines both of them. Here I am using Policy wizard to define both.

      •  Select the drive to be backed up.


      • After defining Client group and Job schedule, click Finish. You can see the pending job details in below screenshot.

      • Here you can see the status of the backup. It shows that backup has been running and sending data at the speed 51.77Mbit/sec on the bottom pane.

      • Here you can see the repository has been filled 5%.

      [facebook src="Uptodatewithme" width="500" height="400" hide-cover="true" posts="true"/]

      How to install and configure Tivoli Storage Manager TSM FastBack Client on Windows

      How to install and configure Tivoli Storage Manager TSM FastBack Client on Windows


      In Linux run the installation process as the root user. The root user profile must be sourced. If you use the su command to switch to root, use the su - command to source the root profile.

      Below schreenshots shows how to install TSM Fastback Client software on client machines 

      Read the terms of the license agreement. You must accept the terms of the license agreement to continue the installation and click Next.

      Give the Fastback server hostname or IP address to which this client has to send backups.


      If the client has only DAS disks, no additional steps are required. When you install the FastBack Client, by default, the SAN Module option is disabled. Use the FastBack Client Configurator to enable the SAN Module option when you use CLUSTER or LANFREE.

      If the client has SAN disks, configure the client according to the following steps:

      • From the Start menu, choose Programs > Tivoli Storage Manager > FastBack > FastBack Client Configurator.
      • Verify the DNS host name or IP address for the FastBack Server system.
      • If you have a cluster environment, enable the SAN Module option.
      • Click OK.
      You can also use the FastBack Client Configurator to connect a FastBack Client to a FastBack Server. To use the FastBack Client Configurator to connect a FastBack Client to a FastBack Server, complete the following steps:

      • On the computer where you installed FastBack Client, from the Start menu, select Programs > Tivoli Storage Manager > FastBack > FastBack Client Configurator.
      • Type the host name or IP address for the FastBack Server.
      • Click OK.
      After you connect a client to a server through the Client Configurator, in the FastBack Manager, you might not see the client in the client list. A client version mismatch is the cause of the problem. To resolve this problem, verify that both the client and the server are using the same version of Tivoli Storage Manager FastBack. After you install the correct version, restart both the client and server by using the Windows Services. To go to to the Services window, click Control Panel > Administrative Tools >Services.

      If you start the executable file for the installation process after you complete the initial installation, a Program Maintenance window is displayed. From this window, there are two options:
      • Modify - Use this option to change the location of the installation.
      • Remove - Use this option to uninstall Tivoli Storage Manager FastBack

      [facebook src="Uptodatewithme" width="500" height="400" hide-cover="true" posts="true"/]