Up_to_date_with_ me: TSM Basics

Why we live in an anti-tech age

Complex planning -- and true innovation -- is out of fashion, argues PayPal co-founder Peter Thiel

Does Science Back Samsung's 80% Battery Boost Claim?

A longer-lasting smartphone battery has been on the to-do list of tech companies for years. And now Samsung claims to have developed one that could keep your phone humming for 80 percent longer. But could the new battery really boost battery life by that much? Some scientists are skeptical, saying the study researchers didn't account for energy that's permanently lost after the battery goes through its first charge-recharge cycle.

US Military's Hypersonic Jet Could Fly 5 Times the Speed of Sound

The U.S. military is reportedly developing a hypersonic jet plane that could soar at up to five times the speed of sound — faster than a bullet, which generally travels at Mach 2, or twice the speed of sound.

World's Thinnest Light Bulb Created from Graphene

raphene, a form of carbon famous for being stronger than steel and more conductive than copper, can add another wonder to the list: making light. Researchers have developed a light-emitting graphene transistor that works in the same way as the filament in a light bulb.

Remote Control Airplanes Review

Remote control airplanes bring the thrill of flight to your backyard or local field

Showing posts with label TSM Basics. Show all posts

Saturday 27 June 2015

5.2 How to monitor and manager TSM Space Reclamation Process ?


Reclamation is the server process of consolidating files from several volumes onto one volume. You can set the reclamation threshold when you define or update the storage pool.
The server reclaims the space in storage pools according to a reclamation threshold that you can set for each sequential-access storage pool. When the percentage of space that can be reclaimed on a volume rises above the reclamation threshold, the server reclaims the volume.

Space on a sequential volume becomes reclaimable as files expire or are deleted from the volume. Reclamation is the process of reclaiming this space. For example, files become obsolete because of aging or limits on the number of versions of a file.

When the percentage of reclaimable space exceeds a specified level, the reclamation threshold, the volume is eligible for reclamation. The server checks at least once per hour whether reclamation is needed and begins space reclamation for eligible volumes. You can set a reclamation threshold for each sequential access storage pool when you define or update the pool.

When multiple volumes are eligible for reclamation, Tivoli Storage Manager reclaims the eligible volumes in random order.


TSM Reclamation
                                                   100%                 40%               30%                    70%
Space within aggregate files is also reclaimed during the reclamation process. An aggregate is a physical file that contains multiple logical files that are backed up or archived from a client in a single transaction. During reclamation, unused space from expired or deleted logical files is removed as the aggregate file is copied to another volume.

When collocation is not used, Automatic data movement also frees up space on tape volumes by consolidating active data from fragmented tape volumes onto a single volume, leaving the original volumes available for reuse. This process is also known as reclamation. For each tape storage pool, you define a reclamation threshold, which indicates the amount of space consumed by data that is no longer valid before triggering reclamation. Specify a value not less than 50% to avoid tape volume reclamation to multiple volumes.

Reclamation is defined as the process of consolidating the remaining data from sequential access volumes onto fewer, new sequential access volumes.
  • A lower threshold results in more tapes and faster reclamation time.
  • A higher threshold results in fewer tapes and longer reclamation time.
  • You use the RECLAIM STGPOOL command to initiate an automatic drive reclamation for a sequential access primary or copy storage pool.
  • Empty tapes move back to scratch or private pools.
  • Reclamation of an active-data pool recovers space that inactive and deleted files use.

Space Reclamation can be configured automatically and manually. To configure automatic reclamation, update the storage pool with RECLAIM parameter. To run a manual reclamation, use the following command as shown below.

reclaim stgpool stgpoolname reclaim=60

Offsite Reclamation on Copy Storage Pools

The tape volumes which are sent to offsite for DR purposes can also be reclaimed without bringing them back to onsite, this process is generally known as offsite reclamation (to know more about this click link). Volumes with the access value of OFFSITE are eligible for reclamation if the amount of empty space on a volume exceeds the reclamation threshold for the copy storage pool or active-data pool. The default reclamation threshold for copy storage pools and active-data pools is 100%, which means that reclamation is not performed.

To cancel the automatic offsite reclamation on copy storagepools, set reclamation threshold to 100% with the define or update stgpool command. Use the OFFSITERECLAIMLimit=0 parameter with the reclaim stgpool command.

update stgpool copystgppols OFFSITERECLAIMLimit=0

You should schedule offsite reclamation process by using reclaim stgpool command when you have less pressure on the TSM server. 

[facebook src="Uptodatewithme" width="500" height="400" hide-cover="true" posts="true"/]

5.3 IBM Tivoli Storage Manager Collocation Overview


Collocation is the process by which the server minimizes the number of sequential access storage volumes to keep files of a single client node or file space of a client node. You can set collocation for each sequential access storage pool when you define or update the pool.

TSM Collocation Overview

By using collocation, you reduce the number of volume mount operations, and the amount of time searching database entries when users restore, retrieve, or recall multiple files. Thus, collocation improves access time for these operations. If collocation is enabled and reclamation occurs, the server tries to reclaim the files for each client node or client file space onto a minimal number of volumes. Collocation cannot collocate data that is already in a storage pool volume. The following options are available for collocation when you use the define stgpool or update stgpool commands
  • No
  • Node
  • File space
  • Group by node
  • Group by file space

Collocation of active data

You can also collocate active data to active-data pools by using one of the following methods
  • Writing data to multiple pools by using simultaneous write. 
  • Copying data to an active-data pool by using the COPY ACTIVEDATA command. Only active versions of backup data are copied from a primary storage pool to an active-data pool. You use the following command

   copy activedata primary_pool_name activedata_pool_name

 How collocation process select volumes ?

Setting COLLOCATION=NODE causes Tivoli Storage Manager to try to put data for one node on as few volumes as possible.

Setting COLLOCATION=FILESPACE causes Tivoli Storage Manager to try to put data for file space for one client node on as few volumes as possible.

Volume selection criteria for COLLOCATION=NODE
  •  A volume that contains files from the same client node.
  • An empty, predefined volume.
  • An empty, scratch volume.
  • Among volumes that contain data, the one with the most free space.

Volume selection criteria for COLLOCATION=FILESPACE
  • A volume that contains files from the same file space of that client node.
  • An empty, predefined volume.
  • An empty, scratch volume.
  • A volume that contains data from the same client node.
  • Among volumes that contain data, the one with the most free space.

Collocation by groups of nodes

Collocation by group provides the following benefits. You must update the storage pool to use collocation by group.
  • Reduce unused tape capacity, with more collocated data on individual tapes.
  • Minimize mounts of target volumes.
  • Minimize database scanning and reduce tape passes for sequential-to-sequential transfer.
  • Minimize database scanning, which reduces tape passes for sequential-to-sequential transfers, such as reclamation.

Use the define collocgroup command to define the group of nodes or filespaces for collocation
define collocgroup groupname

Use the define collocmember command to add a client node to a collocation group

define collocmember groupname node1,node2

After you define groups of nodes, the server can collocate data according to these groups.


Collocation by groups of file spaces

Similarly, use the define collocgroup command to define the group of nodes or filespaces for collocation
define collocgroup groupname

Use the define collocmember command to add a client node to a collocation group

define collocmember groupname filespace1,filespace2

[facebook src="Uptodatewithme" width="500" height="400" hide-cover="true" posts="true"/]

5.4 TSM Data Deduplication Introduction and Features


What is TSM Data Deduplication ?

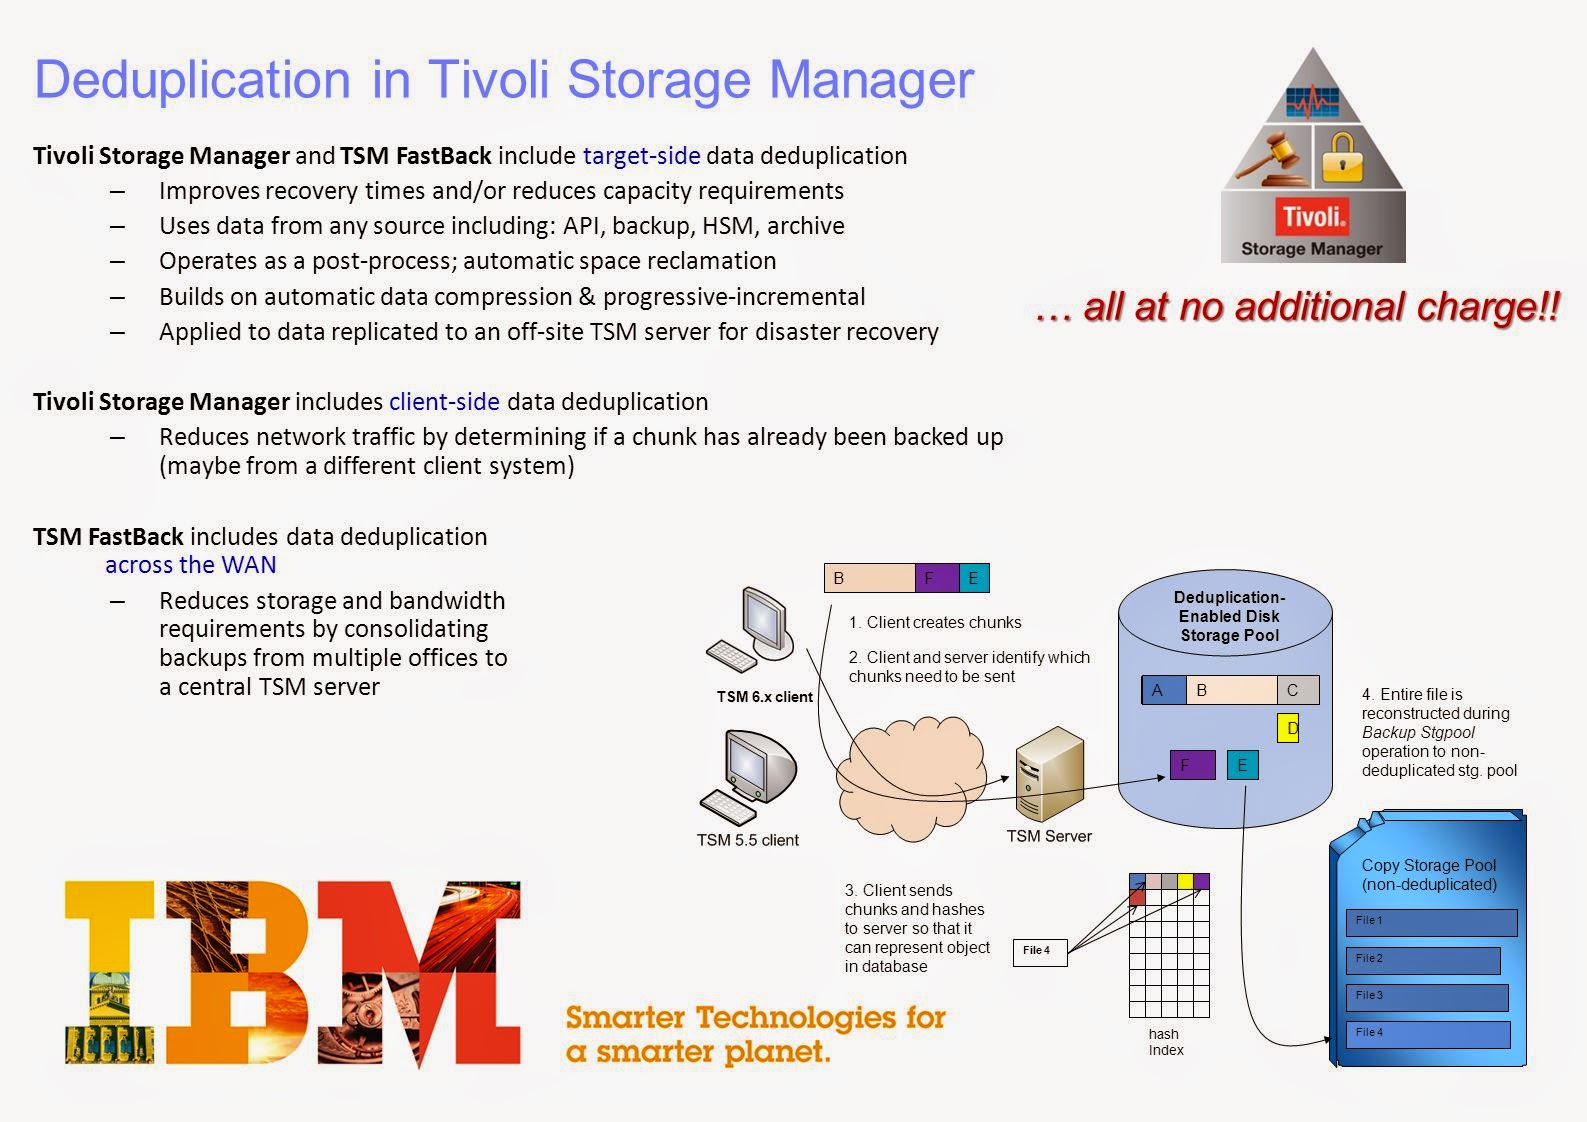
TSM Data deduplication is a method of eliminating redundant data in sequential-access disk (FILE device class) primary, copy, and active-data storage pools. It retains one unique instance of the data on the storage media and replaces redundant data with a pointer to the unique data copy. The goal of deduplication is as follows
  • Reduces the amount of data that you need to store.
  • Reduces the overall amount of time that retrieving data requires. You can store more data on disk rather than on tape.
Tivoli Storage Manager v6.1 introduced server-side data deduplication. Each duplicate block of data is identified and replaced by a pointer. The pointers link to a single, retained copy after the client data is backed up and in a sequential-access storage pool that is enabled for deduplication. From Tivoli Storage Manager v6.2, included a type of data deduplication that occurs on the client side instead. 

In addition to entire files, Tivoli Storage Manager can also deduplicate parts of files that are common with parts of other files. If you update a storage pool for deduplication, Tivoli Storage Manager deduplicates the data that is already stored. No additional backup, archive, or migration is required. Client API data, from the Tivoli Storage Manager family of products, requires more overhead than backup-archive data.

TSM Deduplication Overview

Overview of data deduplication methods

Server-side deduplication

With this method, deduplication occurs after data is backed up to a storage pool that is set up for deduplication.
  • More data travels over LAN because it backs up data first. Server option DEDUPREQUIRESBACKUP YES
  • Client does not do any of the processing to remove duplicate data.
  • Backs up all data to the server.
  • Became available in version 6.1.0.
How to plan and configure TSM Server-side deduplication ?


Client-side or source-side

With this method, the deduplication of files occurs during client backup to a deduplication-enabled storage pool.
  • Less data travels over LAN because deduplication occurs during backup.
  • Client nodes share the work with the server, identifying duplicate data.
  • Requires processing to remove duplicate data that is no longer needed.
  • Does not backup all data to the server.
  • Became available in version6.2.0.
How to plan and configure TSM Client-side deduplication ?

Restoring deduplicated files

If a user restores a file that exists in a deduplicated storage pool, the server uses the index to locate the unique chunks that were stored and reconstructs the file.

[facebook src="Uptodatewithme" width="500" height="400" hide-cover="true" posts="true"/]

5.5 TSM Server-side deduplication Overview


With this method, deduplication occurs after data is backed up to a storage pool that is set up for deduplication.
  • More data travels over LAN because it backs up data first. Server option DEDUPREQUIRESBACKUP YES
  • Client does not do any of the processing to remove duplicate data.
  • Backs up all data to the server.
  • Became available in version 6.1.0.
Tivoli Storage Manager server-side data deduplication is a two-phase process. 

1) The server identifies the duplicate data in the storage pool.

2) Any of the following processes remove duplicate data:
  • Reclamation of volumes in the primary storage pool, copy storage pool, or active-data pool.
  • Backing up of a primary storage pool to a copy storage.
  • Copying of active data in the primary storage pool to an active-data pool.
  • Migrating data from the primary storage pool to another primary storage pool.
  • Moving data from the primary storage pool to a different primary storage pool that is also set up for deduplication, moving data within the same copy storage pool, or moving data within the same active-data pool.
The server-side deduplication process consists of the following:
  • Data is sent from clients to the server.
  • The server creates extents and pointers to the hash index in the server database to relate files to extents.
  • The Backup Stgpool operation copies data to an undeduplicated copy storage pool.
  • Reclaim operations remove duplicate data extents from the primary storage pool. This operation frees unused space.
  • With this approach, deduplication is performed out-of-band, and at least one copy of non-deduplicated data exists.
Check the below video to learn how to configure TSM Server-side deduplication


Planning for server-side deduplication

You can create a new storage pool for deduplication or you can upgrade an existing storage pool. In either case, Tivoli Storage Manager provides the option of running duplicate-identification processes automatically or manually.
  • Before setting up storage pools for deduplication, determine which client nodes have data that you want to deduplicate.
  • Determine which client nodes use this method. You might want to have some clients use server-side and others use client-side deduplication.
  • Decide whether you want to define a new storage pool exclusively for deduplication or update an existing storage pool.
  • The storage pool must be a sequential-access disk (FILE) pool. Deduplication occurs at the storage pool level. All data within a storage pool, except encrypted data, is deduplicated.
  • Decide how you want to control duplicate-identification processes: Automatically Manually.
  • If you have a primary sequential-access disk storage pool and a copy sequential-access disk storage pool, and both pools are set up for deduplication, you might want to run duplicate-identification processes for the primary storage pool only. In this way, only the primary storage pool reads and deduplicates data.
  • When the data is moved to the copy storage pool that has deduplication enabled, the deduplication is preserved. No duplicate identification is required.
  • If you plan to use Simultaneous Write Migration, that data cannot go to a deduplication-enabled storage pool.
  • Disables AUTOCOPY option on the storage pool. Issues warning message.

Controlling number of deduplication processes

The IDENTIFY DUPLICATES command starts or stops processes that identify duplicate data in a storage pool. When you define or update a storage pool for deduplication, you can specify 0 to 50 duplicate-identification processes to start automatically and run for a duration that you specify. 

You can also control deduplication processing manually to avoid resource impacts during server operations.

To get the best performance for your data deduplication processes, specify an increased number of duplicate identification processes.

You can use additional memory to optimize the frequent access of deduplicate extent information that is stored in the Tivoli Storage Manager database.

Effects of turning deduplication off or on 

You can turn deduplication on or off by updating the storage pool definition.
  • UPDATE STGPOOL DEDUPLICATE=NO
  • UPDATE STGPOOL DEDUPLICATE=YES
If you turn deduplication off for a storage pool:
  • New data that enters the storage pool is not deduplicated.
  • Deduplicated data, stored in the storage pool before you turned deduplication off, is not reassembled.
  • Deduplicated data continues to be removed because of normal reclamation and deletion. All information about deduplication for the storage pool is retained.
If you turn deduplication on again for the same storage pool:
  • Duplicate-identification processes resume.
  • Files that have already been processed are skipped.

Tips for deduplication

To reduce the number of times a volume is opened and closed, multiple input FILE volumes in a deduplicated storage pool can remain open at the same time during a session. To specify the number of open FILE volumes in deduplicated storage pools that can remain open, use the NUMOPENVOLSALLOWED server option. Set this option in the server options file or by using the SETOPT command.

The server processes that read data from a deduplicated storage pool and can be affected:
• Volume reclamation

• MOVE DATA or MOVE NODEDATA

• EXPORT

• AUDIT VOLUME

• Storage-pool restore operation

• Volume restore operation

• Data migration

[facebook src="Uptodatewithme" width="500" height="400" hide-cover="true" posts="true"/]

5.6 TSM Client-side deduplication Overview


With this method, the deduplication of files occurs during client backup to a deduplication-enabled storage pool.
  • Less data travels over LAN because deduplication occurs during backup.
  • Client nodes share the work with the server, identifying duplicate data.
  • Requires processing to remove duplicate data that is no longer needed.
  • Does not backup all data to the server.
  • Became available in version6.2.0.

How to configure client-side deduplication ?

  • Primary storage pool must be a sequential-access disk (FILE) storage pool that is enabled for data deduplication.
  • Client-side data deduplication must be enabled on the server by using the DEDUPLICATION parameter on the REGISTER NODE or UPDATE NODE server command.
  • TheDEDUPLICATION option on the client must be set to yes in the client options file.
  • Filesthatareintendedfor deduplication cannot be excluded.
  • Filewithencryption enabled cannot be deduplicated.
Check the below video to learn to configure TSM Client-side deduplication 


Client-side deduplication process

Client-side deduplication uses the following process:
  • The client creates extents. Extents are parts of files that are compared with other file extents to identify duplicates.
  • The client and server work together to identify the extents that the client must send to the server for storage. Only those extents that are identified by the client that do not match extents that exist on the server are sent.
  • The client sends the extents and hash values to a deduplication- enabled storage pool that the server manages. A hash value is a cryptographic irreversible data value that the hashing algorithm generates. The hash value enables comparing two values without the values being disclosed. Tivoli Storage Manager uses hash values to verify data integrity.

Benefits of client-side deduplication

  • Deduplicates file and application data
  • Reduces network traffic by deduplicating data before transfer
  • Reduces storage pool space requirements
  • Faster backups
  • Optimized to reduce network communications when identifying duplicate data
  • New backup-archive client statistics report on deduplication and data reduction savings
  • Exclude specific files on a client from data deduplication with the exclude.dedup client option
  • Data deduplication cache can reduce network traffic

[facebook src="Uptodatewithme" width="500" height="400" hide-cover="true" posts="true"/]

5.7 How to Check errors in tape volumes and move data to another tape volumes


1) You can use the MOVE DATA command to move files from one volume to another volume in the same or a different storage pool by using the following command.

move data volume_name
move data volume_name STGpool=pool_name

2) You can also use the MOVE NODEDATA command to move file spaces for a node from one storage pool to another by using the following command.

move nodedata node_name fromstgpool=source_STGpool tostgpool=target_STGpool

3) Before you delete a storage pool, be sure that you move all the data that you need to retain to another storage pool by using the move data command. 

4) You can use the move nodedata command to move data in a sequential access storage pool for one or more nodes. The command is useful to consolidate data for a specific node within a storage pool. This consolidation helps reduce the number of volume mounts required during a restore operation.

5) You can also use the move nodedata command to move data for a node to a different storage pool. This action is helpful to prepare for client restore processing by first moving data to a random access storage pool. The move nodedata process performs the following tasks
  • Creates a list of nodes and file spaces to move, according to the criteria that the user specifies in the move nodedata command.
  • Starts a queue thread to determine a list of volumes to process.
Τhe volumes added to this list meet the following criteria:
  • Access READWRITE or READONLY.
  • Have data for the node and file spaces that the user specifies.
6) The volumes list that is created also becomes the list of volumes to exclude. After the queue thread finishes, a process thread starts. The MAXPROCESS parameter determines the number of process threads that start. Each process thread that starts performs the following tasks
  • Selects a volume from the volume list.
  • Processes each bit file in the volume to determine whether it must be moved.
  • Uses the move data functions to batch up the file and to move the bit file.
7) The RECONSTRUCT option specifies whether to reconstruct file aggregates during data movement. Reconstruction removes empty space that has accumulated during deletion of logical files from an aggregate.

How to check the errors in Storage Pool Tape Volumes

Use AUDIT VOLUME command to check the inconsistencies between database information and a storage pool volume. While an audit process is active, clients cannot restore data from the specified volume or store new data to that volume.

If the server detects a file with errors, handling of the file will depend on the type of storage pool to which the volume belongs, whether the FIX option is specified on this command, and whether the file is also stored on a volume assigned to other pools.

If Tivoli Storage Manager does not detect errors for a file that was marked as damaged, the state of the file is reset so that it can be used.

If the AUDIT VOLUME command does not detect an error in a file that was previously marked as damaged, Tivoli Storage Manager resets the state of the file so that it can be used. This provides a means for resetting the state of damaged files if it is determined that the errors were caused by a correctable hardware problem such as a dirty tape head.

The Tivoli Storage Manager server will not delete archive files that are on deletion hold. If archive retention protection is enabled, the Tivoli Storage Manager server will not delete archive files whose retention period has not expired.

You can use the following command syntax to audit the volume for checking errors.

audit volume volume_name fix=no/yes

Fix Parameter description
Specifies how the server resolves inconsistencies between the database inventory and the specified storage pool volume. This parameter is optional. The default is NO. The actions the server performs depend on whether the volume is assigned to a primary or a copy storage pool.

For Primary Storage Pool Volumes:

Fix=No
Tivoli Storage Manager reports, but does not delete, database records that refer to files with inconsistencies. Tivoli Storage Manager marks the file as damaged in the database. If a backup copy is stored in a copy storage pool, you can restore the file using the RESTORE VOLUME or RESTORE STGPOOL command.

If the file is a cached copy, you must delete references to the file on this volume by issuing the AUDIT VOLUME command and specifying FIX=YES. If the physical file is not a cached copy, and a duplicate is stored in a copy storage pool, it can be restored by using the RESTORE VOLUME or RESTORE STGPOOL command.

Fix=Yes
The server fixes any inconsistencies as they are detected. If the physical file is a cache copy, the server deletes the database records that refer to the cached file. The primary file is stored on another volume. If the physical file is not a cached copy, and the file is also stored in one or more copy storage pools, the error will be reported and the physical file marked as damaged in the database. You can restore the physical file by using the RESTORE VOLUME or RESTORE STGPOOL command.

If the physical file is not a cached copy, and the physical file is not stored in a copy storage pool, each logical file for which inconsistencies are detected are deleted from the database.
If archive retention protection is enabled by using the SET ARCHIVERETENTIONPROTECTION command, a cached copy of data can be deleted if needed. Data in primary and copy storage pools can only be marked damaged and never deleted.

Do not use the AUDIT VOLUME command with FIX=YES if a restore process (RESTORE STGPOOL or RESTORE VOLUME) is running. The AUDIT VOLUME command could cause the restore to be incomplete.

For Copy Storage Pool Volumes:

Fix=No
The server reports the error and marks the physical file copy as damaged in the database.

Fix=Yes
The server deletes any references to the physical file and any database records that point to a physical file that does not exist.

Watch the below video to learn how to audit a volume and move data to another volumes.


[facebook src="Uptodatewithme" width="500" height="400" hide-cover="true" posts="true"/]

5.8 TSM Node Replication Introduction and Features


The purpose of node replication is to maintain the same level of files on the Tivoli Storage Manager source replication server and the Tivoli Storage Manager target replication servers. 

As part of replication processing, client node data that is deleted from the source replication server is also deleted from the target replication server. When client node data is replicated, only the data that is not on the target replication server is copied.

If a disaster occurs, and the Tivoli Storage Manager source replication server is temporarily unavailable, client nodes can recover their data from the Tivoli Storage Manager target replication server. If the source replication server is unrecoverable, you can convert client nodes for store operations on the target replication server. You can replicate the following types of client node data
  • Active and inactive backup data together, or only active backup data
  • Archive data
  • Data that is migrated to a source replication server by Tivoli Storage Manager for Space Management clients
You can use only Tivoli Storage Manager v6.3 or later servers for node replication. However, you can replicate data for client nodes that are v6.3 or earlier. You can also replicate data that is stored on a Tivoli Storage Manager v6.2 or earlier server before you upgraded it to v6.3.

Node replication Features

  • Provides the ability to incrementally replicate a node’s data to a remote target server for disaster recover purposes.
  • Replicates only directories and files that do not exist on the target server, true incremental replication.
  • Deletes data on target server that is deleted on the source server.
  • Replicates data according to replication rules.
  • Replication occurs between a source and target server.
  • A source server can have only one replication target server.
  • A target server can be the replication target for more than one source server.
Check the below 2 videos to know more about TSM Node Replication.


[facebook src="Uptodatewithme" width="500" height="400" hide-cover="true" posts="true"/]

6.1 TSM Physical Storage Devices Introduction


The combination of the library, drives, and their device class represents the physical device environment. A physical library is a collection of one or more drives that shares similar media mounting requirements. Each drive mechanism within a device, that uses removable media, is represented by a drive object.

For devices with multiple drives, including automated libraries, each drive is separately defined and must be associated with a library. A drive is a hardware device that is capable of performing operations on a specific type of sequential media. Drive definitions include such information as the element address, for drives in SCSI libraries, how often the drive is cleaned, for tape drives, and whether or not the drive is online. These are the terms we use in TSM environment.

Library: A device that organizes and holds one or more media, tape, or disk volumes and an optional robotic mechanism. Use the define library command and the define path command.

Drive: A hardware device capable of performing operations on a specific type of sequential media. Use the define drive command.

Device class: A category that represents a device type that defines the media that the library uses. Use the define devclass command.

Each library or drives requires device drivers to access the drives. IBM devices use IBM device drivers. Non-IBM devices use the TSM device driver in the TSM environment. The following are some of the library and device types we can use in TSM infrastructure. The installation and configuration depends upon the type of library you use.

Types of Physical Libraries

TSM supports different types of libraries, which can be used with TSM server. Check the following link to find the available types of librariesLTO tape technology is used for backup and archive. Advantage of tape is low cost and portability of moving cartridges off-site for disaster recovery purposes.

Tape Library example, TS3500
Tivoli Storage Manager servers frequently store extremely large amounts of data. Tape libraries load required tapes into drives automatically, which might be expandable, depending on model. Some libraries hold hundreds of tape drives and thousands of tapes.

Virtual Tape Library (VTL) example, TS 7650
VTLs are disk devices that can simulate tape by using a software or firmware interface. VTLs might have built-in functions for compression and data deduplication. They are easily configurable when you perform LAN-free backups to disk.

Disk example, DS8000
Disks can be large or small, and might be attached directly to the Tivoli Storage Manager server or connected by using a SAN. Tivoli Storage Manager can store data on Random Access disk pools and store data by using tape volumes that Tivoli Storage Manager software simulates. Using a disk device is fast and reliable, but costs more than other devices.

You can also different/multiple types of drives in the single library, but you need to follow some rules while configuring it. The element number indicates the physical location of a drive within an automated library. IBM Tivoli Storage Manager needs the element number to connect the physical location of the drive to the drive’s SCSI address. When you define a drive, the element numbers are required only for SCSI type libraries. The element number is detected automatically, depending on the capabilities of the library.

How to find devices on AIX

lsdev -Cc disk
hdisk0 Available 40-60-00-4,0 16 Bit SCSI Disk Drive

lsdev -Cc tape
rmt0 Available 1P-08-00-0,0 4.0 GB 4mm Tape Drive
rmt1 Available 1P-08-00-2,0 4.0 GB 4mm Tape Drive
smc0 Available 1P-08-00-3,0 IBM 7336 Tape Medium Changer

You can also enter smitty devices from an AIX command line to list tape drives and tape libraries.

How to find devices on Windows & Linux
You can use tsmdlst command to find devices on Microsoft Windows. Open a system command prompt, and change to the directory that the Tivoli Storage Manager server is installed in.

For default installations, use the following path:
c:\Program Files\Tivoli\TSM\server

To generate the information, enter the following command:
      tsmdlst > devlist.txt

How to install and Configure Tape Library

Before you install and configure Tape library to TSM server, you first have to install suitable device drivers and double check the drives are visible by using OS commands. After the device is installed and recognized by the operating system, configure the devices to the TSM Server. Run the following commands as shown below for defining library and drive paths.

DEFine LIBRary library_name LIBType=library_type

DEFine PATH source_name destination_name LIBRary=library_name SCRType=SERVer  DESTType=LIBRary DEVice=device_name

DEFine Drive library_name drive_name

DEFine PATH source_name destination_name SCRType=SERVer DESTType=DRive DEVice=device_name

Similarly, you have to configure paths for all the available drives.

[facebook src="Uptodatewithme" width="500" height="400" hide-cover="true" posts="true"/]

6.2 How to manage and monitor TSM tape volumes


Tivoli Storage Manager classifies its volumes into the two following categories

PRIVATE: A private volume is a labeled volume that is in use or owned by an application. This volume might contain valid data. You must define each private volume, and must mount it by name. Private volumes do not revert to scratch when they become empty.

SCRATCH: A scratch volume is a labeled volume that is empty or contains no valid data. Use this volume to comply with any request to mount a scratch volume. When data is written to a scratch volume, its status changes to private.

You can change the status of volumes by issuing the update libvolume command. With the command, you can assign a private status to a scratch volume or assign a scratch status to a private volume. The private volumes must be administrator-defined volumes with either no data or invalid data. They cannot be partially written volumes that contain active data. Volume statistics are discarded when volume statuses are modified.

Difference between Scratch and Private Volumes

Scratch volumes:
  • Contain a label
  • Are empty or contain no valid data
  • Change status to PRIVATE when data is written to them
  • Can use to satisfy any request for mounting a scratch volume

Private volumes:
  • Contain a label.
  • Might contain valid data.
  • An application uses or owns them.
  • Use only to satisfy a request to mount the specified volume.

Life cycle of TSM Tape Volumes

You must label tapes first, then add them to the inventory of tapes available to Tivoli Storage Manager. Check tapes in to Tivoli Storage Manager as either scratch or private. Tapes that are part of the scratch pool are eligible to select for use. After a tape is selected, data remains on the tape until it expires or moves. You can then reclaim the tape and return it to the scratch pool.

life cycle of TSM tape volumes

You can use several methods to check in a tape. Check it can in online or offline. You can label and check in one or all of the tapes in one step with label libvol command or use the autolabel=yes feature to define a 349X, ACSLS, SCSI, external, or manual library. See the following example to learn how to label the new tapes and checkin into the library.

Labeling new tapes

When you use the tape volumes for the first time, you have to label the tapes to be recognised by the TSM server. Use the following command to label and checkin those tapes at the same time. Check the TSM admin reference for the full syntax of these commands.

label libvolume library_name checkin=scratch search=bulk|yes labelsource=barcode
    

Search: Specifies that the server searches the library for usable volumes to label. Possible values are as follows:
  • Bulk: Specifies that the server searches the library entry and exit ports for usable volumes to label.
  • Yes: Specifies that the server labels each volume, unless the volume is already labeled or its barcode cannot be read.

Labelsource: Specifies how or whether the server reads sequential media labels of volumes. Possible values are as follows:
  • Barcode: The server attempts to read the barcode label. If the attempt fails, the server does not label the volume, and it shows a message.
  • Prompt: Prompts for volume names as necessary.
  • Vollist (SCSI only) reads for a file or list.

Checking in Volumes

After the volumes are labeled, you make the volumes available to Tivoli Storage Manager devices by checking the volumes into the library volume inventory. You use the checkin libvolume command. Checking media into an automated library involves adding the volumes to the library inventory when the tape is again ready for reuse or removed out from the library. Check in volumes by using a command line with the following commands:

checkin libvolume tapelib JK0007L4 search=no status=scratch

checkin libvolume tapelib search=yes status=scratch checklabel=barcode

Checking out Volumes

You can remove volumes from automated libraries by issuing the checkout libvolume command. For automated libraries with multiple entry and exit ports, you can issue the checkout libvolume command and include the REMOVE=BULK parameter. Tivoli Storage Manager ejects the volume to the next available entry and exit port.

After it is checked out, the volume moves to the entry or exit port if the device has one. If it does not, the operator is prompted to remove the volume from the drive that is within the device. Tivoli Storage Manager mounts each volume and verifies the internal label before checking it out. Check out volumes by using a command line with the following commands:

checkout libvolume library_name volume_name

checkout libvolume tapelib JK0007L4 checklabel=yes remove=bulk

Auditing a Tape Library

You can issue the audit library command to audit the volume inventories of automated libraries. Auditing the volume inventory ensures that the information that the Tivoli Storage Manager server maintains is consistent with the physical media in the library. The audit is useful when the inventory is moved physically. Tivoli Storage Manager deletes missing volumes and updates the locations of volumes that moved since the last audit. Tivoli Storage Manager cannot add new volumes during an audit. Remember that you should run this command when no other activity is running on the library.

          audit library tapelib checklabel=barcode

Watch the below video to learn how to update library volume status


[facebook src="Uptodatewithme" width="500" height="400" hide-cover="true" posts="true"/]

6.3 Using Virtual Tape Library (VTL) in TSM Environment


A Virtual Tape Library or VTL, is an backup solution that combines traditional tape backup methodology with low-cost disk technology to create an optimized backup and recovery solution.  It is an intelligent disk-based library that emulates traditional tape devices and tape formats. Acting like a tape library with the performance of modern disk drives, data is deposited onto disk drives just as it would onto a tape library, only faster. Virtual tape backup solutions can be used as a secondary backup stage on the way to tape, or as their own standalone tape library solution. A VTL generally consists of a Virtual Tape appliance or server, and software which emulates traditional tape devices and formats.

With a virtual tape library (VTL), data can either remain in the virtual tape library as long as there is enough space, or it can migrate to tape for off-site storage, or both. It uses a unique blend of several storage tiers. In addition, it has a combination of high-performance SAN-attached disk and high-performance servers that run Linux, emulating a tape storage device.

VTLs maintain volume space allocation after Tivoli Storage Manager deletes a volume and returns it to a scratch state. The VTL keeps the full size of the volume allocated. This allocation might be large, depending on the devices being emulated. As a result of multiple volumes that revert to scratch, the VTL can maintain their allocation size and run out of storage space.

The only way for the VTL to realize that a volume is deleted and its space can be reallocated is to write to the beginning of the newly returned scratch volume. The VTL then sees the volume as available. Tivoli Storage Manager can relabel volumes that are returned to scratch if the RELABELSCRATCH parameter is specified.

A virtual tape library (VTL) provides high-performance backup and restore by using disk arrays and virtualization software. A VTL can provide the following benefits
  • Helps to validate data recoverability.
  • Reduces the resources that managing tape media requires.
  • Improves backup and recovery and simplifies disaster recovery operations
  • Lowers operational costs and energy usage.
  • Manages more data with less infrastructure.

Defining a virtual tape library (VTL)

Defining a VTL library includes the following parameters:

Virtual Tape Library (VTL) in TSM


LIBType=VTL (Required): Specifies that the library has a SCSI-controlled media changer device that is represented by a virtual tape library.

SHAREd: Specifies whether this library is shared with other Tivoli Storage Manager servers in a storage area network (SAN).

RESETDrives: Specifies whether the server preempts a drive reservation with persistent reserve when the server restarts or when a library client or storage agent re-connection is established. If persistent reserve is not supported, the server performs a target reset.
  • Yes: Specifies that drive preemption through persistent reserve and target reset are performed. YES is the default for a library that is defined with SHARED=YES.
  • No: Specifies that drive preemption through persistent reserve and target reset are not performed. NO is the default for a library that is defined with SHARED=NO.
AUTOLabel: Specifies whether the server attempts to automatically label tape volumes. This parameter is optional. The default is NO. To use this option, you need to check in the tapes with CHECKLABEL=BARCODE on the CHECKIN LIBVOLUME command.

RELABELSCRatch: Specifies whether the server relabels volumes that are deleted and returned to scratch. When this parameter is set to YES, a LABEL LIBVOLUME operation is started and the existing volume label is overwritten.

SERial: Specifies the serial number for the defined library. This parameter is optional. The default is AUTODETECT. If SERIAL=AUTODETECT, when you define the path to the library, use the serial number that the library detects as the serial number. If SERIAL=serial_number, the number that you enter is compared to the number that Tivoli Storage Manager detects.

[facebook src="Uptodatewithme" width="500" height="400" hide-cover="true" posts="true"/]