Up_to_date_with_ me: TSM Fastback

Why we live in an anti-tech age

Complex planning -- and true innovation -- is out of fashion, argues PayPal co-founder Peter Thiel

Does Science Back Samsung's 80% Battery Boost Claim?

A longer-lasting smartphone battery has been on the to-do list of tech companies for years. And now Samsung claims to have developed one that could keep your phone humming for 80 percent longer. But could the new battery really boost battery life by that much? Some scientists are skeptical, saying the study researchers didn't account for energy that's permanently lost after the battery goes through its first charge-recharge cycle.

US Military's Hypersonic Jet Could Fly 5 Times the Speed of Sound

The U.S. military is reportedly developing a hypersonic jet plane that could soar at up to five times the speed of sound — faster than a bullet, which generally travels at Mach 2, or twice the speed of sound.

World's Thinnest Light Bulb Created from Graphene

raphene, a form of carbon famous for being stronger than steel and more conductive than copper, can add another wonder to the list: making light. Researchers have developed a light-emitting graphene transistor that works in the same way as the filament in a light bulb.

Remote Control Airplanes Review

Remote control airplanes bring the thrill of flight to your backyard or local field

Showing posts with label TSM Fastback. Show all posts

Saturday 11 July 2015

How to restore client data from TSM Fastback server repository

How to restore client data from TSM Fastback server repository


  • Recover volumes. For more information about recovering volumes
  • instant restore with FastBack Mount. For more information about instant restore
  • Recover files. For more information about recovering files
During the cleanup process, FastBack Server detects snapshots that are potentially corrupted. When FastBack Server detects a potentially corrupted file, a warning message is displayed and a message is written to the FastBack Server log. During the next scheduled snapshot of the volume a job is run to repair the snapshot. You must not use a potentially corrupted snapshot. If a problem occurs and you need the data before the repair job for the snapshot completes, complete the following steps:
  1. Run the file system check tool. You can see the operating system documentation for more help in completing this step.
  2. Run the application consistency check tool. You can see the operating system documentation for more help in completing this step.

TSM Fastback Restore Procedure

Below Screenshots shoes how to restore FastBack data using Volumes and FastBack Mount.
  • Select the Recovery Tab, which shows various ways to restore the client data
  • To restore the data using volume restore, go the Snapshot Monitor tab and select the completed backup and right click on it. Then select Snapshot Volume Restore option.

  • Now choose the destination to restore the backedup data and click Apply

  • Alternatively if you choose Disk Restore instead of Snapshot volume restore in the previous screenshot, it will ask source and destination for restore. Select the snapshot and the destination disk for recovery as shown below.
  • You can also use FastBack Mount wizard for recovering the data, select the repository and destination to start the recovery process.


[facebook src="Uptodatewithme" width="500" height="400" hide-cover="true" posts="true"/]

How to take backup through TSM Fastback Client on Windows

How to take backup through TSM Fastback Client on Windows


  • A repository should be added in FastBack Server where the server stores client data.
  • Install FastBack Client on client machine and make sure it is running. Use correct hostname or IP address of FastBack Server while starting Client Configurator.
  • Suitable network resources.

TSM Fastback Client Backup Procedure

  • Start FastBack Client Configurator on client machine using corrent fastBack Server IP address and hostname.


  • Open FastBack Manager on the Server, you should see the client hostname in the list under Storage Pool tab. In the belwo screenhsot WIN-7IMV9HRDTBA is our FastBack Client which shows available drives which can be backed up.
  • Select the drive which you to take the backup.

  • Now create policy, which include Job Schedule and Client groups. You can define Job Schedule & Client Groups seperately or you can directly define Policy which automatically defines both of them. Here I am using Policy wizard to define both.

    •  Select the drive to be backed up.


    • After defining Client group and Job schedule, click Finish. You can see the pending job details in below screenshot.

    • Here you can see the status of the backup. It shows that backup has been running and sending data at the speed 51.77Mbit/sec on the bottom pane.

    • Here you can see the repository has been filled 5%.

    [facebook src="Uptodatewithme" width="500" height="400" hide-cover="true" posts="true"/]

    How to install and configure Tivoli Storage Manager TSM FastBack Client on Windows

    How to install and configure Tivoli Storage Manager TSM FastBack Client on Windows


    In Linux run the installation process as the root user. The root user profile must be sourced. If you use the su command to switch to root, use the su - command to source the root profile.

    Below schreenshots shows how to install TSM Fastback Client software on client machines 

    Read the terms of the license agreement. You must accept the terms of the license agreement to continue the installation and click Next.

    Give the Fastback server hostname or IP address to which this client has to send backups.


    If the client has only DAS disks, no additional steps are required. When you install the FastBack Client, by default, the SAN Module option is disabled. Use the FastBack Client Configurator to enable the SAN Module option when you use CLUSTER or LANFREE.

    If the client has SAN disks, configure the client according to the following steps:

    • From the Start menu, choose Programs > Tivoli Storage Manager > FastBack > FastBack Client Configurator.
    • Verify the DNS host name or IP address for the FastBack Server system.
    • If you have a cluster environment, enable the SAN Module option.
    • Click OK.
    You can also use the FastBack Client Configurator to connect a FastBack Client to a FastBack Server. To use the FastBack Client Configurator to connect a FastBack Client to a FastBack Server, complete the following steps:

    • On the computer where you installed FastBack Client, from the Start menu, select Programs > Tivoli Storage Manager > FastBack > FastBack Client Configurator.
    • Type the host name or IP address for the FastBack Server.
    • Click OK.
    After you connect a client to a server through the Client Configurator, in the FastBack Manager, you might not see the client in the client list. A client version mismatch is the cause of the problem. To resolve this problem, verify that both the client and the server are using the same version of Tivoli Storage Manager FastBack. After you install the correct version, restart both the client and server by using the Windows Services. To go to to the Services window, click Control Panel > Administrative Tools >Services.

    If you start the executable file for the installation process after you complete the initial installation, a Program Maintenance window is displayed. From this window, there are two options:
    • Modify - Use this option to change the location of the installation.
    • Remove - Use this option to uninstall Tivoli Storage Manager FastBack

    [facebook src="Uptodatewithme" width="500" height="400" hide-cover="true" posts="true"/]

    How to configure Tivoli Storage Manager TSM Fastback Server and Fastback Manager

    How to configure Tivoli Storage Manager TSM Fastback Server and Fastback Manager


    In Windows The Tivoli Storage Manager FastBack services include FastBack ServerFastBack ClientFastBack DR Hub ServerFastBack MountFastBack data deduplication, and FastBack Watchdog. These services are started under the Local System Account.

    If you experience a malfunction and suspect that the problem might be caused by incorrect authorization, you can run the problematic service from an account that has more privileges. For example, you can log on as a Local or Domain administrator. You can stop and restart the services by using the Windows Services window. To locate the Services window, go to the Control Panel. Go to Administrative Tools > Services

    (Windows 2008 and Vista only) When you start FastBack Mount from the Microsoft Windows Start menu, the service is automatically stopped. You can use the Windows Services window to start the FastBack Mount service. To locate the Services window, go to the Control Panel. Go to Administrative Tools > Services

    In addition, when the FastBack Mount user interface is closed, the FastBack Mount service is restarted. You can use the Windows Services window to stop the service.

    (Linux only) The only Tivoli Storage Manager FastBack services that run on supported Linux operating systems are FastBack Client and FastBack Mount. These services run as the root user. You can start, stop, and query the services by using the following commands:

    Starting & Configuring FastBack Manager

    Before you begin

    Installing the FastBack Server and FastBack Client on the same system is supported. However, if you install the server and client on the same system, before you start FastBack Manager, enable the SAN Module option. When you install the FastBack Client, by default, the SAN Module option is disabled. For more information about enabling the SAN Module option, see Connecting client to server.

                The default <install_directory> path is /opt/IBM/Tivoli/TSM/FastBack/
                Run the following command:

                ./manager/fastbackmanager.sh

                Enter the FastBack Server IP address.
    • In the login window, type your user name. The default user name is admin. The authorization policy is case-sensitive. Letters must be typed in the correct case.
    • Type your password. The default password is admin123. The authorization policy is case-sensitive. Letters must be typed in the correct case.
    • Select a domain. The default domain is XPRESS-RESTORE. After you select the domain, the configuration is loaded.Click Login. A message is displayed.
    •  If this is the first time you start the FastBack Manager, you can click Add Repository to identify a repository. If you do not want to identify a repository, click Cancel.
    • After FastBack Manager is displayed, you can add a repository by selecting General Configuration > Storage Pool > Repository Pool. From the menu, you can add or claim a repository.
    If the FastBack Manager does not connect to the FastBack Server and the FastBack Server is running on a system that is part of an Active Directory domain, complete the following steps:

    • Change the Active Directory settings to allow for anonymous enumeration SID and name translations.
    • Log off.
    • Log on.
    • Restart the FastBack Server service.
    Grant the FastBack Server service administrative rights by changing the logon as properties for the FastBack Server service to an Active Directory administrator account.

    User Management & Security

    With the correct user management definitions, the administrator can secure system access.
    With Tivoli Storage Manager FastBack, the administrator can control user permissions by assigning users to user groups. 

    User groups are named, logical entities. You can assign permissions and users to user groups. There are two ways to set up user groups: 
    • Create and configured user groups in FastBack Manager. User groups that you create in FastBack Manager can have different access permissions. For example, one group might have administrator permissions and another group might have more restrictive permissions. To create and configure user groups, you must be classified as a super user with administrator permissions.
    • Default user groups that are included with FastBack Manager cannot be changed. 
    • Use Microsoft Active Directory user groups that are added to the Active Directory group list in FastBack ManagerFastBack Manager recognizes these group members for the Active Directory as super users. These users are automatically assigned the correct access permissions.
    There are some rules to follow when setting up user groups:
    • A user can be assigned to only one user group.
    • If you are the administrator, change the default password. Use the following rules when changing a password:
      • Passwords cannot match the user name.
      • Password must be at least 8 characters.
      • Passwords cannot exceed 20 characters.
      • Passwords must include at least one digit and one letter.
      • The following characters cannot be used: \*?\"<>|;^'.$#@&,
    You can create new users or change existing users by using the Users and Groups window.

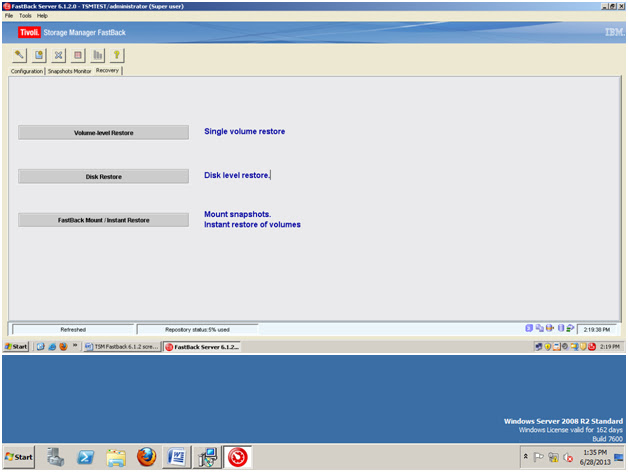
     Configuring Fastback Server Screenshots: 

    • Go to Windows services and the user id which you want to use for the fastback server operationsas shown below.

     
    • Creating Activedirectory user which will make him a Super User in Fastback Server. Later if you find that Fastback manager says limited mode, then this is the first thing you should check. Check if the username you have used having the privileges or not. In the below screenshot I have added user administrator to the AD group Administrators which have all privileges on this system.


    Now, its time to login to the Fastback manager with default username and password and make that administrator username as super user. To do that please see below screenshots.

    After first installation it will ask to add repository, you can add it now or add it later. I will show you both ways.

    Second Method to add repository in Fastback Server. This process can be done anytime after you installed the server. Right click on Repositry and select Add Repository Wizard, you will a pop-up window as shown below.


    In below screenshot, you can see that Repository has been added and used 1%. 


    • Since we are using the default username & password, it is advised that we make our own username as super user. To do that , we need to add that Administrators AD group to Fastback server. Check it out, how to do it.

    • I have added administrator user in TSMTEST domain to the Administrators Active Directory Group, this group should have all privileges. In the below screen I am just selecting that AD group and add the users. Right click on AD Groups tab to add groups


    • Now, we can login with our username and password. This way your server is secure and also have all privileges.


    We have Installed and configured the Fastback Server. Now our server is ready to take the backup from Fastback Clients. Our next step is to install TSM Fastback Client on client machine and take the backup. Check it out how to do it in the next post.

    [facebook src="Uptodatewithme" width="500" height="400" hide-cover="true" posts="true"/]

    How to Install Tivoli Storage Manager TSM Fastback Server on Windows

    How to Install Tivoli Storage Manager TSM Fastback Server on Windows


    You must disconnect the FastBack Server system from the SAN until the FastBack Server installation is complete and the system is restarted.
    To install the FastBack Server on a Microsoft Windows 2003, Windows 2008, or Windows XP x86 system, complete the following steps:

    Installation Procedure


    • Either download the code package or insert the Tivoli Storage Manager FastBack Product DVD into the DVD drive.
    • In the folder for Tivoli Storage Manager FastBack, go to the X86 folder.
    • Start the installation program.
    • The welcome page is displayed. Click Next. The Software License Agreement page is displayed.
    • Read the terms of the license agreement. To accept the license agreement, click Yes. You must accept the terms of the license agreement to continue the installation.
    • A page is displayed prompting you to specify the destination folder where the FastBack Server is to be installed. Accept the default location, or click Browse to go to the location. Click Next.
    • A page is displayed prompting you to select the Installation Type. Select Backup Server. Click Next.
    • Click Next.
    • (Optional) A message about the virtual volume driver not installing for FastBack Mount might be displayed. Click OK to accept the message.
    • The software is installed. To complete the installation of the FastBack Server, restart the computer. Click Finish.
    • (Optional) After the restart, reconnect the FastBack Server to the SAN. Use LUN masking to enable the FastBack Server to see the SAN disks that are backed up.


    Here we can either choose any of those options to be installed. I have selected Advanced option to install more products along with Backup Server.


    Select the products you want to install. Here I also chosen Fastback Manager along with Fastback server and Mount.


    Enter the name of the Fastback Server, You also can use static IP Addresses. 


    In the below step assign a login name to the fastback server. This login name should have administrator privileges or else it will be in Limited User mode. 


     If you start the executable file for the installation process after you complete the initial installation, a Program Maintenance window is displayed. From this window, there are two options:
    • Modify - Use this option to change the location of the installation.
    • Remove - Use this option to uninstall Tivoli Storage Manager FastBack.

    [facebook src="Uptodatewithme" width="500" height="400" hide-cover="true" posts="true"/]