Up_to_date_with_ me

Why we live in an anti-tech age

Complex planning -- and true innovation -- is out of fashion, argues PayPal co-founder Peter Thiel

Does Science Back Samsung's 80% Battery Boost Claim?

A longer-lasting smartphone battery has been on the to-do list of tech companies for years. And now Samsung claims to have developed one that could keep your phone humming for 80 percent longer. But could the new battery really boost battery life by that much? Some scientists are skeptical, saying the study researchers didn't account for energy that's permanently lost after the battery goes through its first charge-recharge cycle.

US Military's Hypersonic Jet Could Fly 5 Times the Speed of Sound

The U.S. military is reportedly developing a hypersonic jet plane that could soar at up to five times the speed of sound — faster than a bullet, which generally travels at Mach 2, or twice the speed of sound.

World's Thinnest Light Bulb Created from Graphene

raphene, a form of carbon famous for being stronger than steel and more conductive than copper, can add another wonder to the list: making light. Researchers have developed a light-emitting graphene transistor that works in the same way as the filament in a light bulb.

Remote Control Airplanes Review

Remote control airplanes bring the thrill of flight to your backyard or local field

Monday 25 April 2016

Linux Introduction

Linux Introduction


    UNIX is the first Operating system in the world, developed by Kem Thompson and Dennis 
      Ritchie in 1969 at Bell Lab by AT&T Company
            IBM    :           AIX
            SGI     :           IRIX
            Sun     :           Solaris
            Free software foundation organization, they start a project by name GNU. The main 
      aim of this project is to develop such an operating system that can run on any platform.
    In 1991, a student Linuz Torvalds developed a kernel named Linux’s kernel plus GNU 
    application called Linux operating system.

Linux is an open source technology.
Different companies that provide Linux in Market are Redhat, SuSe, Scientific, Centos, and 
Knoppix etc.

FEATURES:


Ø  Linux is the fastest Operating system in the world. It runs 2 to 3 times fast than 
    windows OS.
Ø  Linux is the much secured OS because there is no any problem of virus.
Ø  Linux file format is text format and windows file format is binary format.
Ø  Linux is very reliable OS because kernel of Linux is very stable as compare to 
    windows kernel not crashed easily.
Ø  Kernel of Linux is very small in size it can be stored in floppy.
Ø  Linux uses the x-Window system which is advanced network windowing system. 
     Using this system we can display output of any workstation monitor attached in the network.

ADVANTAGES:


Ø  Virus Proof
Ø  Crash Proof
Ø  Economical
Ø  Multiuser, Multi-Tasking and Multi processing capacity
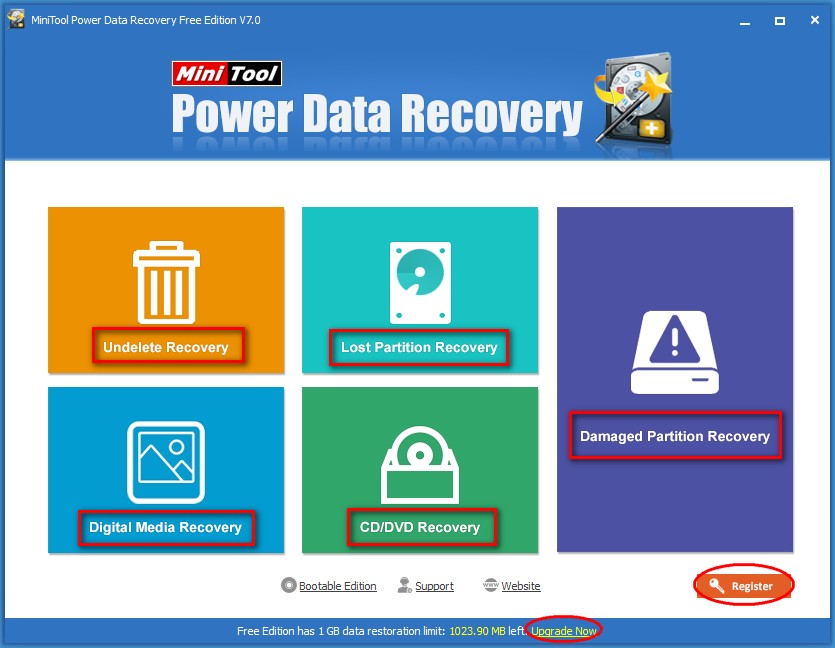
LOGIN MODES:

Two modes:

1.Text mode (CLI)   - All the commands can be executed 

2.Graphical Mode (GUI)
Login to Text mode we have use (Ctrl+Alt+F1…..F6, F8….F12) (Ctrl+Alt+F7) for Graphical Mode


OPEN SOURCE

       The idea behind Open Source software is rather simple: when programmers can read, distribute
    and change code, the code will mature. People can adapt it, fix it, debug it, and they can do it at a
 speed that dwarfs the performance of software developers at conventional companies. This software
will be more flexible and of a better quality than software that has been developed using the
conventional channels, because more people have tested it in more different conditions than the
 closed software developer ever can.

        The Open Source initiative started to make this clear to the commercial world, and very slowly,
commercial vendors are starting to see the point. While lots of academics and technical people have
already been convinced for 20 years now that this is the way to go, commercial vendors needed
applications like the Internet to make them realize they can profit from Open Source. Now Linux
 has grown past the stage where it was almost exclusively an academic system, useful only to a
handful of people with a technical background. Now Linux provides more than the operating system:
there is an entire infrastructure supporting the chain of effort of creating an operating system,
of making and testing programs for it, of bringing everything to the users, of supplying maintenance,
updates and support and customizations, etcetera. Today, Linux is ready to accept the challenge of
a fast-changing world.

 Please write your valuable comments...

[facebook src="Uptodatewithme" width="500" height="400" hide-cover="true" posts="true"/]

How To Recover Data After Hard Drive Crash

How To Recover Data After Hard Drive Crash


During computer using, hard drive is consciously or unconsciously damaged and this usually leads to crash and data loss. Therefore, how to recover data after hard drive crash becomes a frequently asked question among users. 

What Is Hard Drive Crash

Hard drive crash, namely hard drive damage, usually includes logical damaged and physical damage. The former belongs to soft failure while the latter is hardware failure, which could hardly be fixed. 

Recover data after hard drive crash 1 
In general, logical damage includes partition table lost/damage, MBR damage, track servo information error, system information error and section logical error. This kind of damage is usually easy to be recovered by just adopting a professional and dedicated program. 

In the meantime, physical damage refers to the damage of each component of a hard drive. The damaged part must be changed to get hard drive work normally again. Scratches on platter, head wear, circuit board’s short circuit and chip burning are all included in this type of hard drive damage. Though physical damage could be solved easily, the important data in physically damaged drive may be lost forever. That’s why we should be as careful as we can when using computer. 

For users’ information, there are 6 signs that may indicate a bad sector/track. Please pay enough attention to those signs so as to rescue your significant data timely from hard drive before it finally becomes dead. 

Recover data after hard drive crash 2 

1.A weird sound is coming from computer when it is started normally. 

2.Data Error Reading Drive D:, General Failure Reading Drive C: or Sector Not Found error message appears and leads to boot failure, while virus infection is excluded. 

3.Scandisk is automatically run to detect disk error each time when system is booted successfully. 

4.When performing FDISK to hard disk, you find it was stuck in a certain point, going forward and backward repeatedly. 

5.When you plan to format a partition on hard drive, the process is stuck in certain stage and error finally occurs, making you end up in failure. 

6.Hard drive read error appears constantly when a file is reading or a program is running, suggesting file corruption and other information. Besides, if the disk reading process takes too long or the blue screen appears during reading, it also suggests that there’s bad sector/track on hard drive. 

Here’s a conclusion: when any one of those signs show up, please seize time to recover data from your internal hard drive or external hard drive to avoid permanent data loss. 

Hard Drive Types You Should Know

Before we talk about how to recover data from a dead hard drive, we think it’s very necessary to introduce the classification of hard drive to all of you. Hard drive can be divided into different types according to different classification methods. 

Recover data after hard drive crash 3 

  • External hard drive and internal hard drive: depending on the way of placement, hard drive is generally divided into external hard drive and internal hard drive and this is believed to be the most ordinary classification method.


  • Internal hard drive is usually built inside our computer and we rarely have chance to get access to it. However, things are very different when it comes to external hard drive. Also known as mobile HDD (hard disk drive), external hard drive is widely used in our daily life to store large but frequently needed files. In this way, we can carry it around wherever we want and use files stored in it at any time. 

    As you may know, there’s no obvious difference between internal hard drive and external hard drive except for the portability and capacity. Therefore, the way to recover data from external hard drive and the way to recover data from internal hard drive are nearly the same. 

    Want to know the best part? To be honest, as the data recovery software which owns large numbers of users, MiniTool Power Data Recovery is definitely a good choice to recover data from a dead hard drive, no matter it is internal or external. 

    Recover data after hard drive crash 4 

  • Laptop hard drive and desktop hard drive: the hard disk is divided into laptop hard drive and desktop hard drive due to different computer types.


  • Just as the name implies, laptop hard drive refers to the hard drive used in laptops, while desktop hard drive is the storage device used in desktop computers. In this sense, recovering data from laptop hard drive equals to restoring laptop data most of the time. 

    Recover data after hard drive crash 5 

  • IDE hard drive, SATA hard drive, SCSI hard drive and fiber channel hard drive: hard disk drive interface is the connecting part between the host system and hard drive and it plays an important role in the data transmission. Thus, the program running speed and system performance are largely decided by the hard drive interface performance.


  • Hard drive is generally divided into IDE hard drive, SATA hard drive, SCSI hard drive and fiber channel hard drive according to different interfaces. IDE interface is mainly used for household products, and it is also partially applied to server. However, SCSI interface is mainly used on server market. As for fiber channel interface, it only shows up in some high-end servers because of its expensive price. 

    You might be wondering: what the main function of SATA is. As a matter of fact, SATA is the most popular hard drive interface on current market. That’s why so many users are eager to know how to recover data from SATA hard drive. 

    The full name of SATA is Serial Advanced Technology Attachment, also known as Serial ATA. It adopts the serial connection method and the bus is equipped with embedded clock signal. 

    In this way, SATA interface has stronger error correction capability and is able to check the transmitting commands (not just data). Error will be corrected automatically once it is detected and this greatly improves the reliability of data transmission.


Common Hard Drive Crash Cases

Case 1: RAW hard drive problem
Are you familiar with this scenario: hard drive becomes RAW somehow when you try to use it? This is actually a typical kind of hard drive crash that bothers lots of users. According to research, the cause for this problem is very complex; no one can name the exact reasons for sure. But we only need to know that the state of RAW hard drive is a little bit like the hard drive which hasn’t been initialized yet. 

Perhaps the only problem lies in how to recover data from hard drive without formatting. How to bring it back to normal state and use for further data storage? We’ll teach users how to recover data after hard drive crash step by step in the following content. 

Recover data after hard drive crash 6 

Case 2: accidentally formatted drive
Accidental formatting is also another frequently seen issue that could lead to serious data loss. Once formatting is done, nothing left in the target drive. And it is unlike deletion situation, in which users can try to check the Recycle Bin to find deleted data. Nevertheless, users don’t need to worry too much if they want to recover data from hard drive after formatting. 

That is because data will not be really removed out from the drive to which formatting has been performed. On the contrary, they still stay at the same place where they were located before getting missing and they remain recoverable unless new data are written in and take the place of them. But before that happens, you have a lot of time to successfully recover data after hard drive crash with a wonderful program. 

Case 3: partition is lost from hard drive
Recover data after hard drive crash 7In addition to partition formatting, partition loss is also a horrible accident. It’s a nightmare for users who stored significant personal data & business documents in the lost drive. Causes for this problem can be generally divided into two types: human error and unexpected hardware/soft failure. 

Human error means that users deleted partitions or necessary files for partition displaying carelessly while using computer. Hardware failure basically refers to the physical damage of hard drive while soft failure includes system crash, virus attack, software conflict, and so on. Users also needn’t worry too much when they’re in face of partition loss since the “Lost Partition Recovery” module in MiniTool Power Data Recovery is designed exactly for solving this problem. 

Now, we’re going to offer users the perfect solution in detail. 

A Perfect Solution to Hard Drive Crash Accident

In above mentioned hard drive crash cases, no files could be found in Windows Recycle Bin. Though there are lots of data recovery companies who’re willing to help users solve data loss problem at any time, it will cost much money and may lead to privacy or trade secrets leakage. For this reason, users still need a piece of data recovery software to recover crashed disk. 

In summary, MiniTool Power Data Recovery is our recommendation. It is a free program but regarded as one of the best recovery tools by numerous users. It owns these merits: powerful functions, high effectiveness, virus-free, small size and excellent compatibility (supporting different file systems like FAT12, FAT16, FAT32 and NTFS, and almost all common storage devices & Windows operating systems). Here are the steps you should follow to easily recover data after hard drive crash. 

Step 1: free download MiniTool Power Data Recovery from the download center and then install it to the computer hard drive. You’re not expected to choose the drive with lost data (waiting to be recovered) for installation since this may damage your data and make them gone forever. 

Recover data after hard drive crash 8 

Step 2: you are supposed to choose an appropriate one from following five modules which are available for you after opening the data recovery software you’ve just installed: 

- “Undelete Recovery”: recover deleted files & folders after quick scan.
- “Lost Partition Recovery”: recover data from missing partition (deleted or lost somehow).
- “Damaged Partition Recovery”: recover data from RAW, formatted or attacked partition.
- “Digital Media Recovery”: recover multimedia files from flash drive and memory stick.
- “CD/DVD Recovery”: recover lost files & folders from CD/DVD discs. 

Annotation of each module would emerge when you put the mouse pointer on them. 

Note: you’re only allowed to recover 1GB data with the free edition of MiniTool Power Data Recovery. If you want to recover more, you need to upgrade it to advanced editions by clicking “Upgrade Now” or just press “Register” to input your license key if you have already bought one. 

Now, click on the certain module to enter (in case 1 and case 2, users should choose “Damaged Partition Recovery” while in case 3, they need to select “Lost Partition Recovery” instead). Here, we take “Damaged Partition Recovery” as an example to show you how to recover data from hard drive after formatting. 

Recover data after hard drive crash 9 

Step 3: in the lower right corner of this interface, three buttons are available: 

- “Back”: help you go back to the main interface and choose another module for help.
- “Open”: you could directly open partition and search for partition data with prerequisite that this partition is intact or else this option is useless.
- “Full Scan”: when partition can’t be accessed at all (which suggests severe damage), you can click this to detect files in it. 

Recover data after hard drive crash 10 

Step 4: then, you can see a file list with both lost data and existing data. Now, please check files you want to recover and click “Save” -> choose the destination -> click “OK”, and then the entire process to recover data after hard drive crash is finished. 

You can check the recovered data by opening the drive you selected for storing them. If you need to know more about “Lost Partition Recovery” module, please go there. Should you have any questions, you’re welcome to contact us through email.

[facebook src="Uptodatewithme" width="500" height="400" hide-cover="true" posts="true"/]

Monday 13 July 2015

ACTIVATING WINDOWS 8 WITHOUT USING CRACK OR PATCH


ACTIVATING WINDOWS 8 WITHOUT USING CRACK OR PATCH


Windows 8 is the latest collection to the Microsoft operating system (OS). Windows 8 has a slick design and it is also very nice to use with some extra features that will make you love it even more.windows 8 operating system
I love windows 8 and its features but to be honest with you guys, I don’t have the money to purchase its license so I decide to search online to see if I’d see a crack or a patch for my windows 8. Hey! For your information guys I had no luck searching for the crack because all I could find was virus, buggy and empty cracks that crashes my system over and over again. We all know that window 8 is a new OS and the crack might be hard to find but I never gave up, so after my long search, I saw just a serial number so I decide to put the serial key manually myself and after many trial and errors, I finally made my windows 8 fully genuine. Yayyy
Right now, you too can activate your windows 8 with this trick I am about to drop to be fully genuine without the fear of bug or viruses. I am ready if you’re ready…

HOW TO ACTIVATE YOUR WINDOWS 8 TO BE FULLY GENUINE

First of all you will open your command prompt as administrator by pressing the windows key and X key together
have you opened the command prompt?
Now type exactly what you see below (Press enter after each line)
slmgr /upk
slmgr /ipk NG4HW-VH26C-733KW-K6F98-J8CK4
slmgr /skms lunar21.no-ip.org:80
slmgr.vbs -ato
Have you completed writing the above command? If you’re done, restart your pc and voila, you have successfully activated your windows 8 to be fully genuine. Now enjoy your activated windows 8 and be limited no more…
This trick was tested on Windows 8 Professional Retail. Enjoy yourself and activate yours today.
What are the questions that are running through your mind? Pour your speech using the comment box below and if you got something to add up to the topic then use the comment box below as well.
Do you like the post? Then do click the like button, share and recommend us to friends. Oww before you go, subscribe to our feed for latest update to your mail.

[facebook src="Uptodatewithme" width="500" height="400" hide-cover="true" posts="true"/]

Saturday 11 July 2015

Troubleshooting problems and issues in TSM Fastback for workstation Clients V6.3

Troubleshooting problems and issues in TSM Fastback for workstation Clients V6.3


Files can fail backup for several reasons. Some common reasons are provided in this section.
  • Storage for backup copies is not correctly configured in Tivoli Storage Manager FastBack for Workstations.  If the area to store backup copies of your protected files is not properly specified, Tivoli Storage Manager FastBack for Workstations can not back up files.
  • If Files to protect are incorrectly configured in Tivoli Storage Manager FastBack for Workstations.  The files that Tivoli Storage Manager FastBack for Workstations protects are configurable. If you have configured your list of protected files incorrectly, Tivoli Storage Manager FastBack for Workstations does not back up the files.
  • Files in use are not backed up by Tivoli Storage Manager FastBack for Workstations. Attempts to perform a local or remote backup of a file that is saved but not closed can fail. This can occur with Quicken Quick Books objects (files with an extension ending in .QBW).
  • Files are not backed up to Tivoli Storage Manager server if Tivoli Storage Manager node name does not match the host name. If the node name assigned by the Tivoli Storage Manager administrator is different from the Tivoli Storage Manager FastBack for Workstations client host name, back up to the Tivoli Storage Manager server fails. The reason is that the Tivoli Storage Manager FastBack for Workstations cannot identify itself properly to the Tivoli Storage Manager server.
  • If Tivoli Storage Manager client node lacks authority to delete backup copies. If Tivoli Storage Manager FastBack for Workstations does not have delete backup permission on the Tivoli Storage Manager server, it cannot successfully purge older files when the designated storage space is getting full.

Tivoli Storage Manager FastBack for Workstations user interface replaces existing browser session

When the user interface is started, it replaces an existing browser session. You can change this behavior by changing the settings in more recent versions of Mozilla Firefox and Internet Explorer. In Internet Explorer version 7, you can prevent this behavior. In Internet Explorer version 7 and later versions, change the tabbed browsing settings as follows:
  1. In Tools menu, choose Internet Options. The Internet Options notebook displays.
  2. Select the General tab. The General page displays
  3. In the Tabs section, click on Settings. The Tabbed Browsing Settings dialog displays.
  4. In the Open links from other programs in: section, click the A new window option.
  5. Click OK, the Tabbed Browsing Settings dialog exits.
  6. In the Internet Options notebook, click OK.
  7. The Internet Options notebook exits and your new settings are applied.
In Mozilla Firefox version 1.5.0.10 and later versions, change the browsing settings as follows:
  1. In Tools menu, choose Options. The Options notebook displays.
  2. Select the Tabs tab. The Tabs page displays
  3. In the Open links from other applications in: section, click the A new window option.
  4. Click on OK, the Options notebook exits and your new settings are applied.

Tivoli Storage Manager FastBack for Workstations user interface contains no file data

If the Tivoli Storage Manager FastBack for Workstations daemon is not running, or if your browser is in offline mode, the Tivoli Storage Manager FastBack for Workstations user interface contains no file data. This condition is accompanied by an error message which begins like this: FPA_getNamedObject: Could not find:. There are two possible causes for this problem.
  • Your browser is offline.
Your browser must be in online mode to see file data. Internet Explorer and Firefox browsers are turned on- or off- line by checking or unchecking File > Work Offline from the browser menu. Confirm that this menu item is not checked.
  • The Tivoli Storage Manager FastBack for Workstations daemon is not running.
To determine if the Tivoli Storage Manager FastBack for Workstations daemon is running, and restart if necessary.

The number of backup copy versions is greater than configured in Tivoli Storage Manager FastBack for Workstations

The number of backup copy versions exceeds How many versions to keep configuration setting. The problem occurs when file versions are not tracked properly.

The problem can occur because data folders were not removed between an uninstall and a new installation. The new installation does not have a record of the backup copies created from the previous install and use of the product. This can occur on local storage, remote storage, or both. For a list of folders to remove after uninstall, and before installing again, see Cleaning up after uninstallation.

The problem can also be caused, on remote storage only, because of changes to the encryption or compression settings.

When encryption or compression settings are turned on or off, the versions counter is reset to 0, even if some backup copies exist. This behavior results because Tivoli Storage Manager FastBack for Workstations tracks file versions without encryption/compression differently than file versions with encryption/compression.

As an example, assume that a file file.txt is continuously protected, and reached its five version limit (5 is the default version limit). The backup copies were not encrypted or compressed. The user then enables compression. Tivoli Storage Manager FastBack for Workstations then creates up to five new backup copy versions of the file. The restore view shows five versions of the file having name file.txt (corresponding to the original five versions backed up without compression), and five versions of the file named file.txt.cdp (corresponding to the new five versions backed up with compression enabled).

Limit user access to files on a target file server

Set up the security permissions on a target file server to make sure that users only have access to the files that they back up.

By default, the first client that connects to a given server share creates the RealTimeBackup directory. Permissions assigned to the RealTimeBackup directory do not prevent users from reading files they do not own.

The settings used in this example assume one primary user of Tivoli® Storage Manager FastBack for Workstations on the client. This primary user is the first user from a client that connects to the server and creates the subdirectory for files backed up from that client. If Tivoli Storage Manager FastBack for Workstations operates from other accounts on that client, failures might occur when copying files to the remote server. Error messages such as Failed to open the destination file are logged to the activity report.
Windows file server.

Restoring many files from a single directory Tivoli Storage Manager FastBack for Workstations

When restoring many files from a single directory using the restore wizard, a message saying that the script is taking too long displays.

When using the restore wizard to list the contents of a directory containing over 3000 files, the browser issues a message saying that the script is taking too long. If you see this message, you can choose to allow the script to continue. Otherwise, you can also choose to customize the behavior of this dialog to avoid the message.

Backup fails after configuration because of insufficient IPV6 permissions

If Tivoli Storage Manager FastBack for Workstations does not have IPv6 or the appropriate permissions to the IPv6 path, then reports cannot be sent to the Central Administration Console.

If you do not have IPv6, Tivoli Storage Manager FastBack for Workstations is not able to report to the Central Administration Console (CAC). After configuration, Tivoli Storage Manager FastBack for Workstations uses the IPv6 path to reach the administration folder. If the client was using an IPv4 path prior to this release, it switches to IPv6.

Configuration scripts created using the CAC use the IPv6 path in the configuration script field to denote the location of the administration folder. If the user does not have IPv6 or does not have the appropriate permissions to the IPv6 path, then Tivoli Storage Manager FastBack for Workstations will not be able to send reports to the CAC. To resolve the issue, set up IPv6 and ensure that the account running the client has the correct permissions to the IPv6 path.

[facebook src="Uptodatewithme" width="500" height="400" hide-cover="true" posts="true"/]

How to restore TSM FastBack Exchange Individual Email and .PST file - Video Tutorial

How to restore TSM FastBack Exchange Individual Email and .PST file - Video Tutorial


Define the correct FastBack server IP address in the FastBack client configuration.If the NIC interfaces on the FastBack server have IP addresses that belong to different networks, use the route command on the FastBack client computers to connect to the correct FastBack server IP address. It is best practice to maintain single NIC card on FastBack server to restrict annoying problems like this

Example (Windows):

route add <fastback address="" ip="" server=""> <fastback address="" gateway="" ip="" server="">

The <fastback address="" ip="" server=""> is the IP address of the NIC to which the FastBack server service is assigned.

The <fastback address="" gateway="" ip="" server=""> is the IP address of the FastBack server NIC, which is connected to the same network with the FastBack client.

========================================================================


FastBack Client doesn't connect to FastBack Server even though the correct IP address of the server is specified in FastBack Client Configurator. This problem happens in case that hostname of the server cannot be resolved by specified IP address.

Add hostname and IP address into hosts file of the client machine, or specifies DNS server in the property panel of Internet Protocol (TCP/IP) to resolve hostname by IP address.

========================================================================

After you install Tivoli Storage Manager FastBack Server software, any drive you attach to the FastBack server will need to be opened for read/write privileges before being used.

If you use the "Add Repository Wizard" to add a disk to the Repository, you can select to add the whole disk to the repository, and FastBack Manager will open the disk for read/write for you, so you do not have to perform the DiskOpen.

If you plan to add the volume (e:\(New Volume) in this case), you must use the DiskOpen utility.

Warning: Attaching a disk with existing data to the FastBack server is not recommended since the existing data might get corrupted.

========================================================================

A FastBack for Exchange restore fails with MAPI Error even when the Storage Group Database is mounted. The following error message is displayed:

"FBSX7059E Error enumerating items in mailbox.
Ensure that Storage Group Database is mounted."

Complete the actions in the following checklist to resolve the problem:
·       Ensure that a mailbox exists.
·       Ensure that the mailbox is active. In other words, you can log into this mailbox and you can send or receive messages.
·       Ensure that you have sufficient privileges to access mailbox.
·       Ensure that the Exchange server where the mailbox database is located is accessible.
·       Ensure that the Microsoft Information Store service is running.
·       Ensure that the Microsoft Exchange System Attendant service is running.
·       Ensure that For Exchange 2010, the RPC Client Service is running.

After you verify all of these checks, install ExchangeMAPICDO again.

 =======================================================================

On Exchange Server 2010, restore of an individual mailbox fails with this message:
"Mailbox restore failed. ACN5909E The MAPI subsystem logon has failed.
Please check that you have an active mailbox and sufficient privileges for this operation."

Resolving the problem
Due to Microsoft changes in Exchange Server 2010, it was necessary to have both the Client Access Server Role and the Mailbox Server Role installed on the machine where the Data Protection for Exchange mailbox restore is being performed. This limitation only exists until the following fixes are applied.

Microsoft has corrected this problem and the fix is included in the Exchange 2010 SP1 Rollup 2 release. The Data Protection Exchange client will also need to be upgraded to version 6.1.3.1 or greater as indicated in APAR IC73387. After both of these fixes are in place, then the Mailbox Restore will be able to be performed when the Client Access Server and Mailbox Server roles are on separate machines within the Exchange 2010 environment.

If the Data Protection for Exchange has been upgraded, but not the Exchange Server software, it is possible to set the CLIENTACCESSserver parameter in the tdpexc.cfg file to point to the CAS Server directly. This will also allow the individual mailbox restore to process when running on an Exchange 2010 Server that has not been upgraded to SP1 Rollup2 or greater.


[facebook src="Uptodatewithme" width="500" height="400" hide-cover="true" posts="true"/]